So, it's been a pretty good year and all, but I won't talk about all that...
Since my last blog post I've mostly been doing non-programming related things. To give you a bit of an insight in things to come I made a very small list of topics that I'm going to talk about in the coming weeks.
- XML Tweaking (tweaking 'constant' values like player runspeed in runtime using XML)
- XNA Console Component (I've used the XNA Console Component (by Kevin) and I will talk about integration of numerical values to set things like gridsize, as seen in a previous video on this blog)
- Tutorial about the 3D Gizmo. People have been asking me to release the source/snippets of the gizmo code, so I'll think about creating a tutorial or simply releasing it as full source project.
- More lighting and texturing with Sunburn.
- Possible beginners guide to integrating sunburn into your new/existing game.
...And of course there is many more that will follow. These topics are just a few things I have in mind for early 2010. I hope you will enjoy them. If you have any suggestions, please leave your comment below.
Wednesday, 30 December 2009
Friday, 25 December 2009
Line rendering part 2.
Mostly just some screen caps and a video to showcase the grid. It’s basically centered, re-colored and two special lines are added that indicate the exact middle of the scene.

The further you get away from the lines, the more constrast you will notice between the two colors.

Close-up view of the grid, not much more to say :)
Lines are very difficult to see in the video...
Thursday, 24 December 2009
How to render a Grid...
As I previously mentioned. I’ve been working on a grid for my game. So far the grid has been working, but was not visually present in the game. There is a good MSDN tutorial explaining how to render a line in your scene. MSDN Points, Lines and Primitives
It’s a good starting point if you’re trying to implement your own line renderer for your game. Luckily for some of us (Sunburn owners) this has been done for us by Synapse Gaming. It’s called the LineRenderHelper() and can be utilized for easy line rendering. Below is the result of a quick setup with the line renderer.

How it works…
You simply create a new LineRenderHelper() and pass it the maximum amount of points your grid will contain. Every line has a start and end point, so it’s 2 vertices for each line.
LineRenderHelper line = new LineRenderHelper(100); // This will create the helper with a maximum capacity of 100 vertices, or 50 lines.
Method for setting up the array of lines to be drawn.
public void SetGridLines(int grid, int lines, Color color)
{
for (int i = 0; i < lines; i++)
{
line.Submit(Vector3.Left * grid * i, (Vector3.Left * grid * i) + Vector3.Forward * (grid * (lines - 1)), color);
line.Submit(Vector3.Forward * grid * i, (Vector3.Forward * grid * i) + Vector3.Left * (grid * (lines - 1)), color);
}
}
This code will set up the array of lines. I pass a grid (empty space between the parallel lines) , lines (amount of lines that should be drawn) and the color.
To submit a line, all you need to do is call the Submit method.
line.Submit(*start_vector3*, *end_vector3*, *color*);
This will add a single line to your renderer. If you try to execute your code, nothing will show on screen. This is because the helper is not automatically drawn. You need a BasicEffect to do this.
Draw Code:
// Setup your basicEffect
basicEffect.World = Matrix.Identity;
basicEffect.View = camera.View;
basicEffect.Projection = camera.Projection;
basicEffect.VertexColorEnabled = true;
//Start the effect
basicEffect.Begin();
foreach (EffectPass pass in basicEffect.CurrentTechnique.Passes)
{
pass.Begin();
//render all lines stored inside the helper class
line.Render(Engine.GraphicsDevice);
pass.End();
}
basicEffect.End();
This is pretty basic, and should not need much explanation if you’ve ever worked with BasicEffect. If you’ve placed this correctly in your draw code, you should now see the lines on screen.

Of course, like mentioned before…You need Sunburn to use this helper class.
Sunburn Framework is currently in Beta. If you’re interested in using Sunburn, you should definitely sign-up and start using Sunburn. Sunburn Community Forums
Results of a quick stress-test:
Up to 200k vertices the scene would run fairly smoothly (on my laptop Asus M50VN) stressing it up to 1.000.000 vertices (making 500k lines) got my FPS down to 5. But it was still very possible to navigate around the scene. You only need a few dozen lines for your scene at any given time. So should not ever run into trouble with your FPS because of your Grid, which in the end, will most likely not even be rendered in your final game.

It’s a good starting point if you’re trying to implement your own line renderer for your game. Luckily for some of us (Sunburn owners) this has been done for us by Synapse Gaming. It’s called the LineRenderHelper() and can be utilized for easy line rendering. Below is the result of a quick setup with the line renderer.

How it works…
You simply create a new LineRenderHelper() and pass it the maximum amount of points your grid will contain. Every line has a start and end point, so it’s 2 vertices for each line.
LineRenderHelper line = new LineRenderHelper(100); // This will create the helper with a maximum capacity of 100 vertices, or 50 lines.
Method for setting up the array of lines to be drawn.
public void SetGridLines(int grid, int lines, Color color)
{
for (int i = 0; i < lines; i++)
{
line.Submit(Vector3.Left * grid * i, (Vector3.Left * grid * i) + Vector3.Forward * (grid * (lines - 1)), color);
line.Submit(Vector3.Forward * grid * i, (Vector3.Forward * grid * i) + Vector3.Left * (grid * (lines - 1)), color);
}
}
This code will set up the array of lines. I pass a grid (empty space between the parallel lines) , lines (amount of lines that should be drawn) and the color.
To submit a line, all you need to do is call the Submit method.
line.Submit(*start_vector3*, *end_vector3*, *color*);
This will add a single line to your renderer. If you try to execute your code, nothing will show on screen. This is because the helper is not automatically drawn. You need a BasicEffect to do this.
Draw Code:
// Setup your basicEffect
basicEffect.World = Matrix.Identity;
basicEffect.View = camera.View;
basicEffect.Projection = camera.Projection;
basicEffect.VertexColorEnabled = true;
//Start the effect
basicEffect.Begin();
foreach (EffectPass pass in basicEffect.CurrentTechnique.Passes)
{
pass.Begin();
//render all lines stored inside the helper class
line.Render(Engine.GraphicsDevice);
pass.End();
}
basicEffect.End();
This is pretty basic, and should not need much explanation if you’ve ever worked with BasicEffect. If you’ve placed this correctly in your draw code, you should now see the lines on screen.

Of course, like mentioned before…You need Sunburn to use this helper class.
Sunburn Framework is currently in Beta. If you’re interested in using Sunburn, you should definitely sign-up and start using Sunburn. Sunburn Community Forums
Up to 200k vertices the scene would run fairly smoothly (on my laptop Asus M50VN) stressing it up to 1.000.000 vertices (making 500k lines) got my FPS down to 5. But it was still very possible to navigate around the scene. You only need a few dozen lines for your scene at any given time. So should not ever run into trouble with your FPS because of your Grid, which in the end, will most likely not even be rendered in your final game.

Tuesday, 22 December 2009
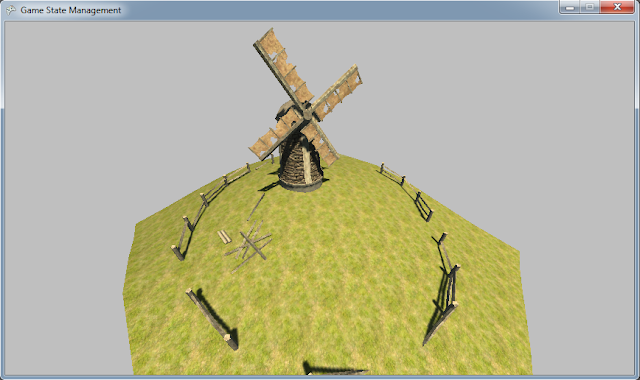
Game State Management with Sunburn
GameStateManagement_Sunburn.rar
A quick post, about the infamous GameStateManagement sample from XNA Creators Club combined with Sunburn Lighting en Rendering System.
I made this in reply of a forum post made on the sunburn forums. You obviously need Sunburn to use this sample.
What it does...
I simply used the 'Sunburn Simple Integration' code provided with Sunburn 1.2.6. and combined it with the GSM sample from XNA CC. The code is provided 'as-is' and all credit should to go the XNA creators and Synapse Gaming.

Holidays and upcoming changes
Hi,
First of all, happy holidays everybody! It's (most likely) going to be the first white christmas in the netherlands since 1981 (I wasn't even born at the time!)
Altho, it's not all as well this time a year. Someone broke into my Gmail account and probably did some things. So far, the damage isn't so bad, it mostly feels weird when someone is trying to steal your identity. So I'm trying to get all my things back together and make sure it won't happen again...
For now tho, I've been enjoying the holidays and haven't spend a lot of time on the development project (not much since my last post) But, I have plans...I'm going to draw out a complete overview of the engine's structure (and will most likely post it here) to get myself back on track. I was working on so many features at the same time that I lost myself in all the work. So taking some time this holiday to slowly get back on the right track, aswell as taking some time to finally design some games.
I have some homemade challenges that I'd like to complete, to get my mind of engine programming for a bit (in the end, I'm building this engine for game design, not to become a world class programmer)
So to all who's reading this (and everyone else!) MERRY CHRISTMAS!
Sunday, 20 December 2009
Using Transparency with Sunburn
After using my old-timer model in the previous demo (with physics) I noticed the wheels were not as transparent as they should be. The problem was pretty easily solved. I set the Transparancy to ‘Clip’ and it was fixed. As I was already prepared to spend a lot more time on transparency, I decided to test the alpha quality and shadow map when using alpha’s.
To spare you the boredom of reading. I compiled a few images and a video to demonstrate my first night of playing with Alpha/Transparency.
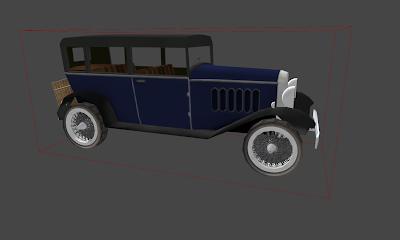
Result of changing transparency mode to ‘Clip’
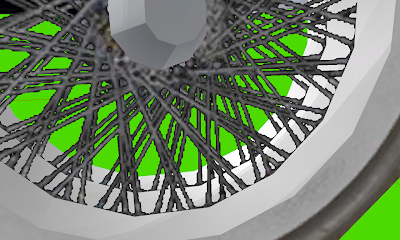
Close up shows black lines around the spokes, this is due to my (bad) texture skills :P
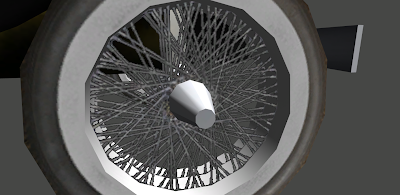
Quick patch-up in Photoshop, adjusted the texture file (removed most of the blackness)
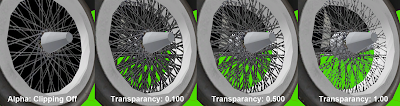
Quick overview of the effect when changing Transparency value.
Video: Some fun with lighting and shadows using Alpha Textures.
That's it for today, if you have any questions or comments, please post them below...
To spare you the boredom of reading. I compiled a few images and a video to demonstrate my first night of playing with Alpha/Transparency.

Result of changing transparency mode to ‘Clip’

Close up shows black lines around the spokes, this is due to my (bad) texture skills :P

Quick patch-up in Photoshop, adjusted the texture file (removed most of the blackness)
Quick overview of the effect when changing Transparency value.
Video: Some fun with lighting and shadows using Alpha Textures.
That's it for today, if you have any questions or comments, please post them below...
Saturday, 19 December 2009
BEPU Integrated...Today!
There is not much to show today, unfortunately. Most of my work today involved removing the old JigLibX code and replacing it with BEPU Physics.
I did some basic primitive collision tests, dynamic vs. kinematic and a triangleMesh test (done with a 1100 poly car model) So far, no real problems occured. I have to create a new and solid system to add (and save) collision models to later reload into my game.
So, next on my list is to finish the StaticMeshActor class I've been working on. It's not very complex, but should form a solid base for all static meshes in the game.
I hope to have more to show by tomorrow...
Note: the vehicle collision is a ConvexHull, and the Box is made of a...Box.
If you're interested in BEPUphysics, check out their site:
BEPU Physics
I did some basic primitive collision tests, dynamic vs. kinematic and a triangleMesh test (done with a 1100 poly car model) So far, no real problems occured. I have to create a new and solid system to add (and save) collision models to later reload into my game.
So, next on my list is to finish the StaticMeshActor class I've been working on. It's not very complex, but should form a solid base for all static meshes in the game.
I hope to have more to show by tomorrow...

Note: the vehicle collision is a ConvexHull, and the Box is made of a...Box.
If you're interested in BEPUphysics, check out their site:
BEPU Physics
Friday, 18 December 2009
Editor Basics (Viewports)
Yesterday I got to work on the viewports for the stand-alone editor. It will be using the same layout as most other 3D applications (UnrealEd, 3Dsmax and Maya) so it needs orthographic and perspective viewports.
To set this up, not much work is needed. First I created a new camera class called ‘OrthographicCamera’ inheriting from Camera.cs (that’s is my base class for any camera) To create an orthographic view you will need Matrix.CreateOrthographic()to create your Projection. This is fairly straight forward and should not be too much of a hassle to do. To add ‘Zoom’ functionality all you need is a value that can change the width/height of the orthographic projection. I used my viewport width and divided it by a zoom value that could be increased/decreased using the zoom keys.
Next on the list was a system that allows 4 viewports to be rendered on the screen. This aswell is pretty easy to do. If you’ve ever created a split screen option for one of your games, this won’t need much further explanation. If you haven’t, I suggest you read MSDN Splitscreen It’s a great example of how to implement split screen into your game. The editor viewports work pretty much the same way.
Most 3D applications have the ability to either render Solid geometry or change to a Wireframe rendertype. It can be very helpful to allow your Orthographic views to render wireframes instead of solid geometry. It’s very straightforward to do in Sunburn. For every rendercall (you call it once for each viewport) add a Fillmode enumerator (Microsoft.Xna.Framework.Graphics.Fillmode) and set it to either Fillmode.Solid or Fillmode.Wireframe. With Sunburn you will simply call your ‘RenderManager.RenderFillMode = Fillmode.Wireframe’ and you’re done. This can be optimized (I try to avoid setting renderstates as much as possible) so I will get back on this later on.
If you do not own a copy of Sunburn, you can use the following line to create the same result.
GraphicsDevice.RenderState.FillMode = Fillmode.Wireframe;
The picture below is a quick draft of the editor layout. It’s nothing special and looks like any other editor you can find on the internet. My main goal is to make it intuitive and quick. A recognizable UI will help achieving this.
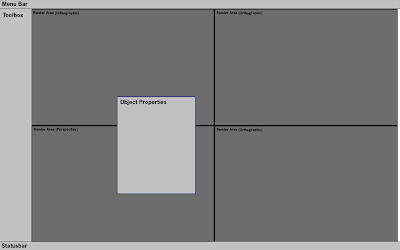
Note: The engine will not only feature a stand-alone editor, but will accompanied by an special in-game editor. This editor will make heavy use of the integrated Console, Gizmo’s and XML. More on this in a future blog…
To set this up, not much work is needed. First I created a new camera class called ‘OrthographicCamera’ inheriting from Camera.cs (that’s is my base class for any camera) To create an orthographic view you will need Matrix.CreateOrthographic()to create your Projection. This is fairly straight forward and should not be too much of a hassle to do. To add ‘Zoom’ functionality all you need is a value that can change the width/height of the orthographic projection. I used my viewport width and divided it by a zoom value that could be increased/decreased using the zoom keys.

Next on the list was a system that allows 4 viewports to be rendered on the screen. This aswell is pretty easy to do. If you’ve ever created a split screen option for one of your games, this won’t need much further explanation. If you haven’t, I suggest you read MSDN Splitscreen It’s a great example of how to implement split screen into your game. The editor viewports work pretty much the same way.
Most 3D applications have the ability to either render Solid geometry or change to a Wireframe rendertype. It can be very helpful to allow your Orthographic views to render wireframes instead of solid geometry. It’s very straightforward to do in Sunburn. For every rendercall (you call it once for each viewport) add a Fillmode enumerator (Microsoft.Xna.Framework.Graphics.Fillmode) and set it to either Fillmode.Solid or Fillmode.Wireframe. With Sunburn you will simply call your ‘RenderManager.RenderFillMode = Fillmode.Wireframe’ and you’re done. This can be optimized (I try to avoid setting renderstates as much as possible) so I will get back on this later on.

If you do not own a copy of Sunburn, you can use the following line to create the same result.
GraphicsDevice.RenderState.FillMode = Fillmode.Wireframe;
The picture below is a quick draft of the editor layout. It’s nothing special and looks like any other editor you can find on the internet. My main goal is to make it intuitive and quick. A recognizable UI will help achieving this.

Note: The engine will not only feature a stand-alone editor, but will accompanied by an special in-game editor. This editor will make heavy use of the integrated Console, Gizmo’s and XML. More on this in a future blog…
Wednesday, 16 December 2009
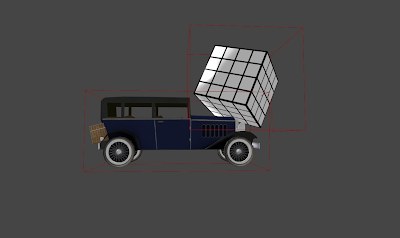
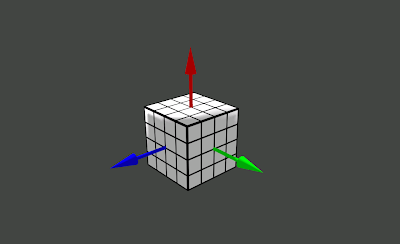
Gizmo...[Continued]
As Matt requested in his comment, I'll go a little more in-depth with the Gizmo system described earlier.
First off, it's not a very complex system. I use the .fbx mesh (three arrows) simply for the visual representation of the axis. The actual magic happens in an invisible level, using Rays and BoundingBoxes.
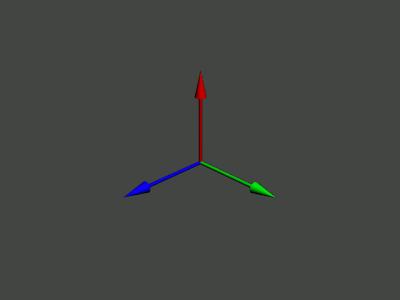
Every axis (arrow) has a boundingbox roughly the size of the arrow itself. Called something like "BoundingBoxY" or just anything that would make sense for an upward pointing boundingbox.
Whenever I try to select the gizmo with my mouse (left-button) it will check whether it's active, if that's true, it will cast a ray to see which BB is hit, if any.
At this point you will probably see where I am going...Holding the mouse down and calculating the Delta of the X and/or Y mouse axis, you simply add these values to the position of you selected object (Don't forget to update the position of your gizmo)
I really hope this will help you towards creating your own Gizmo. If you remain with any questions, please ask in the comments below.
I can't give any particular Code Snippets yet, as it's a WIP. It's still unoptimized(but working) code. If I happen to finish the code completely I will post a sample somewhere so people can use/learn from it.
First off, it's not a very complex system. I use the .fbx mesh (three arrows) simply for the visual representation of the axis. The actual magic happens in an invisible level, using Rays and BoundingBoxes.
Every axis (arrow) has a boundingbox roughly the size of the arrow itself. Called something like "BoundingBoxY" or just anything that would make sense for an upward pointing boundingbox.
Whenever I try to select the gizmo with my mouse (left-button) it will check whether it's active, if that's true, it will cast a ray to see which BB is hit, if any.
At this point you will probably see where I am going...Holding the mouse down and calculating the Delta of the X and/or Y mouse axis, you simply add these values to the position of you selected object (Don't forget to update the position of your gizmo)
I really hope this will help you towards creating your own Gizmo. If you remain with any questions, please ask in the comments below.

I can't give any particular Code Snippets yet, as it's a WIP. It's still unoptimized(but working) code. If I happen to finish the code completely I will post a sample somewhere so people can use/learn from it.
Tuesday, 15 December 2009
Gizmo...
You may notice the console in the top halve when I'm changing the grid size...
This is the XNA Console Component by Kevin Jurkowski. Modified by me to allow numerical values for use like the grid size. It's the same for the Gizmo, it will need some cleaning up before I can call it final (I will probably upload the source later on, but not before I feel it's clean enough to do so)
If you're interested in any of these techniques, leave a comment below.
(Update: I noticed that the console is unreadable due to the small size of the video on blogger, I will try to find a fix for this)
Submerged (School Project)
Unfortunately the game could never reach a 'final' state, so we haven't spend much time tweaking of...anything. Player model was supposed to be just a placeholder, but was kept ingame till the deadline.
Fortunately we all learned a lot in the proces of creating this game. And I can re-use a lot of the technology added into the engine during development. Such as animation and sunburn rendering.
If time permits I will add a gameplay video later on...
Update:

Fortunately we all learned a lot in the proces of creating this game. And I can re-use a lot of the technology added into the engine during development. Such as animation and sunburn rendering.
If time permits I will add a gameplay video later on...
Update:
Monday, 14 December 2009
Using the Engine
My latest school project was built-upon the CoreEngine. A lot has changed during the development of that project.
Animation support was added (Video features XNAnimation and their PlayerMarine)
Sunburn Lightning & Rendering was added to the engine...

More integration with JigLibX and NPC pathnodes...
And ofcourse a lot of bugfixing :)
I will post some screenshots of our final product, called Submerged (as far as we could finish it during our 4 weeks of development)
More of this in a later Blog.
Animation support was added (Video features XNAnimation and their PlayerMarine)
Sunburn Lightning & Rendering was added to the engine...
More integration with JigLibX and NPC pathnodes...
And ofcourse a lot of bugfixing :)
I will post some screenshots of our final product, called Submerged (as far as we could finish it during our 4 weeks of development)
More of this in a later Blog.
Welcome
Welcome to the Core Engine's Development Blog. Here you can read about the development proces of my 3D XNA Engine. Based upon the Innovative Engine by Sean James.
In my blogs I will talk about newly added features and give some basic examples to work on yourself.
I hope you will enjoy reading this blog. If you have any questions or comments, just add a comment below the blog.
In my blogs I will talk about newly added features and give some basic examples to work on yourself.
I hope you will enjoy reading this blog. If you have any questions or comments, just add a comment below the blog.
Subscribe to:
Posts (Atom)