Monday 28 June 2010

Post-Processing Volumes

This time I'll keep the words to a minimum and let the images speak for themselves...(more info below)

Base Image

Increased black-point

Cold tint

Warm tint

If you've ever tried Post-Process Volumes inside of UDK/UE3 then you'll be familiar with the concept. I've tried to replicate a lot of its features. You can affect highlights, midtones and shadows (as seen in the images above) as well as bloomscale, blur, noise etc. They all react to the position of the player (inside or outside of the volume) and will transistion between the values when you enter/leave the associated volume. I'll upload a video of that later on...On a sidenote, I've made a lot of progress with the animation editor, more info on that will be available later on just like the video :)

Saturday 26 June 2010

Engine Update: (Finally?) Switching to Winforms

You might argue it's about time the engine got a proper interface, I agree :) I was trying to avoid using winforms (to keep compatibility with Xbox easy and maintainable to name a reason) and using the console for most if not ALL runtime actions (except for the Gizmo) I had my reasons for not using winforms, but after rethinking the overall design of the engine, its time to do things a little bit different...

One of the reasons that got me doubting the usability of the current interface is a new (and still WIP) feature for creating animations at runtime. The goal of the Animation Editor is not to create complex character animations, but rather allow the creation of quick and dynamic animations for rigid objects such as doors and elevators. At first I made it compatible with the Console like any feature prior to this one...It works, but is definitely not the best way to do animations. It's hard to know what keyframes are used, and what the timelines looks like...I made a very simple elevator animation (with acceleration and deceleration) and it does work...however it's not very flexible, at all.

That got me thinking and finally got me to try winforms...After an hour of experimenting, it finally worked. I'm pretty new to winforms, but it surprised me how easy most things can be achieved with very little effort. For starters I made a "Search Actors" window as well as a "Object Properties" window. Both are shown below. (Click on image for full-size)


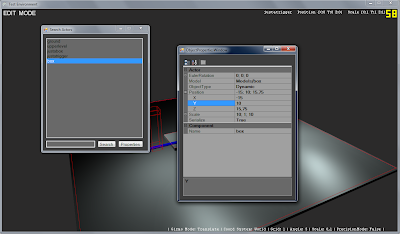
The Search window can be activated using "Ctrl-F" like many other applications, clicking the "properties" button with an object selected will show its...properties.

I have a few other browsers/windows I'd like to get working on in the next couple of days (Tracker window, Content Browser, Animation Editor) I'm currently looking at UDK (Unreal Development Kit) for inspiration on browsers/windows. Their Content Browser is pretty great, and would really help with game development if Core Engine had something similar.
During development of "Over Night" we did lack a proper naming convention and both the asset naming and asset count quickly got out of hand. In the end it took a lot of time to find the proper texture file or locate a specific model.

I think I've talked enough about winforms for now :) I've got a few other features lined up, most of them are already working properly, but are still in early alpha stage...

Sunday 20 June 2010

Engine Update: Scripting, ReverbVolume & Tracking Window

The first one is the ReverbVolume as seen in other game engines like Unreal Engine 3. The volume is very useful when defining rooms,allowing you to alter sound properties when either inside or outside of the volume. The volume alternation is already working when inside or outside of the volume, ironically the only thing that is not yet in place is the Reverb effect itself. I'll explain ReverbVolumes a little more in-depth later on once I've completed finished it, hopefully including the actual Reverb effect instead of just the volume/pitch modifiers. In the video on the bottom you can see/hear it for yourself.

The white box is the reverb volume, the blue circles are ambient sounds emitters (or actually the radius of the emitter)

Another concept I've been experimenting with is a sort of Tracking Window (or output/clipboard window) It's an additional (and optional) window that you can use to print out useful information. You can choose to print it as a static string. As a sort of clipboard/memory aid to help with Vector positions or pretty much any piece of info you may need to remember in runtime. If it were nothing more than that, it would pretty much be an in-editor notepad...So I added something I like to call "live-tracking" (or real-time tracking, or just tracking...) You can use the tracking feature to keep track of any property an object may have (positions, rotations, scale, volume, pitch, visbility etc.) the window uses a series of Slots that can be filled with one traceable object each. Most of it is already working, I'll have to spend some more time on it to add every little detail. Eventually I'd like to have each slot assessable and allow user input to change any of the properties that is being tracked by the window. You can see a sneak preview of it in the video below.

The tracker window is tracking the positions of 3 objects in the scene.

The last thing I worked on today was a basic scripting/event system. In both "Needle Juice" & "Over Night" the event code got really messy over time, requiring a lot more time to find anything...which is a complete waste of time, especially when you're nearing the end of a project. In order to prevent this from happening again I need to have a solid and clean system to handle events and scripts. So far I redesigned the TriggerVolume class used for any positional triggers and added support for Enter/Leave Volume events. To test the new system I made a (simple) script that opens and closes a door when the player approaches.

All of the described features above are shown in the short video below. Make sure to turn on your sound, because the reverbvolume can only explain itself with sound ;)


The first sound you hear is that of a bar, the second is a bit more difficult to hear, it represents the streets just outside of that same bar. when you move through the door, the indoor sound will fade to a lower volume while the street ambient becomes more noticeable.

Saturday 12 June 2010

Over Night: In-game screenshots

A collection of in-game screenshots taken during development of our project "Over Night".


Over Night: Official Trailer Released!

The first official gameplay trailer of "Over Night" a game made in XNA.

The game was created within 8 weeks with a team of 4 students (and some additional outside help, see below for the full team setup)


The Team:

Mitch Manders (Design & Modeling)
Jorry Rosman (Concept Art & Textures)
Bas Babroek (Game Programming)
Tom Looman (Engine/Tech Programming)

Special Thanks to:

Paul van Gent (Audio)
Marvin Nooitgedacht (Video Editing)
Davy Jacobs (Animation)
Bo van Oord (Desert Eagle modeling, textures & animation)
Jeffrey van der Heul (Modeling)

Friday 11 June 2010

Over Night: Deadline reached!

We have finally reached the deadline of our project "Over Night". We had our final presentation (10min long trailer & making-of) yesterday with some time for others to actually step in and play the game themselves. We're very pleased with the results with only 8 weeks development. Below is a first (dev) video of the game, the trailer will be uploaded tonight...

Video: (Be sure you watch it in HD)

More development videos will be online once I get home.