We've just finished the second trailer of our game. It features our second level "Climb" which was created for our Breach gametype. The "Mateba" our multi-purpose weapon (with both short and long range capabilities) and Leap our primary ability are all included in this new video.
As always, the most recent updates on our development are available at our website: http://grim.morepolygons.com
Showing posts with label Video. Show all posts
Showing posts with label Video. Show all posts
Thursday, 17 May 2012

Saturday, 5 May 2012
Gameplay Trailer of "Grim"
Our first gameplay trailer for "Grim"! It mainly features our first deathmatch level "Outpost" along with Deathmatch itself. In future updates we will go into more detail about the unique elements of "Grim". Hope you enjoy!
Sunday, 26 June 2011
Vertex Manipulation (Mesh-editing)
Editing models inside my engine has been something I wanted to support for a long time now. Especially when you're not the one creating the assets, but do have to work with them inside the editor it can be time consuming to send back a model with incorrect material names or a mesh that should be split to optimize rendering, or vice versa. With this tool I will eliminate the need to have artists re-export their models because of tiny mistakes/changes and should provide a much cleaner pipeline in general.
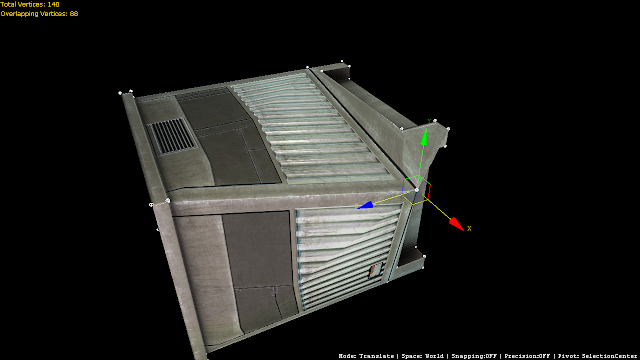
Currently only the very core of this feature has been implemented (as seen in the video) and a lot of other stuff is still to follow, I will give a brief overview of how the fully functional tool should work once its complete. When any new model (.fbx or .x) is imported, it's processed by the content pipeline and turned into an .xnb file, an .xml file will be attached to the source (model) file that contains all changes to the model and will be processed during build-time. By default this .xml file is empty and nothing altered, during run-time a mesh can be converted to Editable Mesh (trying to keep this similar to 3D Studio Max's naming conventions) which allows vertex and triangle selection with support for any type of transformation that is supported by the gizmo component (translate, rotate, scale in local- and world-space) these transformations are stored inside Actions (I will talk about Actions a lot more at a later time, but it's basically what you use to support undo/redo in any kind of editing software) and written to the model Xml. The model is then re-build the next time the project is build and the actions are applied, this can hold any type of alteration including material renaming, splitting meshes and deleting / adding new vertices alongside vertex transformations.
Because the source model remains untouched, whenever the model is re-exported from any DCC-tool like 3D Studio Max or Maya the model will still build with all transformations and alterations applied. An example: A material named '#46 Material' is renamed at run-time to 'corridor_floor', if the artist then changes the name of '#46 Material' to 'corridor_floor' or something else in the source model, the run-time change is ignored because the original material name (#46 Material) can no longer be found... in a worst-case scenario this ignores the material properties you stored for the original name (material properties are stored elsewhere, so no data is actually lost) so even in the worst case, you are only a small step away from re-applying your previous changes (A warning dialog with failed conversions should help with this, making it potentially very quick and painless to manually re-assign the changes that are never lost, just ignored till resolved) The same applies to vertex transformations, but these can be a bit more difficult to keep track of once the indices of a certain mesh change inside the .fbx source file.
There is still a significant amount of work that has to be completed before this feature takes it full shape, with this first proof of concept up and running I believe it will be a very valuable tool to have available, and a lot of fun to create :)
It proved to be quite easy to convert the gizmo to support vertex manipulation (and selection) I will add these changes to the codeplex project at some point in the future...

Currently only the very core of this feature has been implemented (as seen in the video) and a lot of other stuff is still to follow, I will give a brief overview of how the fully functional tool should work once its complete. When any new model (.fbx or .x) is imported, it's processed by the content pipeline and turned into an .xnb file, an .xml file will be attached to the source (model) file that contains all changes to the model and will be processed during build-time. By default this .xml file is empty and nothing altered, during run-time a mesh can be converted to Editable Mesh (trying to keep this similar to 3D Studio Max's naming conventions) which allows vertex and triangle selection with support for any type of transformation that is supported by the gizmo component (translate, rotate, scale in local- and world-space) these transformations are stored inside Actions (I will talk about Actions a lot more at a later time, but it's basically what you use to support undo/redo in any kind of editing software) and written to the model Xml. The model is then re-build the next time the project is build and the actions are applied, this can hold any type of alteration including material renaming, splitting meshes and deleting / adding new vertices alongside vertex transformations.
Because the source model remains untouched, whenever the model is re-exported from any DCC-tool like 3D Studio Max or Maya the model will still build with all transformations and alterations applied. An example: A material named '#46 Material' is renamed at run-time to 'corridor_floor', if the artist then changes the name of '#46 Material' to 'corridor_floor' or something else in the source model, the run-time change is ignored because the original material name (#46 Material) can no longer be found... in a worst-case scenario this ignores the material properties you stored for the original name (material properties are stored elsewhere, so no data is actually lost) so even in the worst case, you are only a small step away from re-applying your previous changes (A warning dialog with failed conversions should help with this, making it potentially very quick and painless to manually re-assign the changes that are never lost, just ignored till resolved) The same applies to vertex transformations, but these can be a bit more difficult to keep track of once the indices of a certain mesh change inside the .fbx source file.
There is still a significant amount of work that has to be completed before this feature takes it full shape, with this first proof of concept up and running I believe it will be a very valuable tool to have available, and a lot of fun to create :)
It proved to be quite easy to convert the gizmo to support vertex manipulation (and selection) I will add these changes to the codeplex project at some point in the future...
Saturday, 21 May 2011
'Depth Dependent Halos' for Wireframe rendering [Part 3]
It took a while to upload (on 56k wireless connection) but the video is finally available on YouTube. If you haven't seen the previous posts about this topic, the effect is based on UDK's implementation of 'Depth Dependent Halos' to increase readability of wireframes in complex scenes.
After I managed to get the desired effect I could simplify it significantly. Moving from two render-passes to one and from 18 texture look-ups to 'just' 9. This was possible by removing the normal 'diffuse' pass which is nothing more than the regular colored wireframe you can see in the video (when the halos are toggled-off), and instead using the information available inside the depth-buffer to construct the wireframe. This is pretty easy if you take into account that if (depth == 1) there is no geometry, where if (depth < 1) there is in fact a line that was drawn when constructing the depth-buffer. From this you create a colored wireframe and the halo inside the post-processor. The same data can be used to determine intersecting lines...removing the need for 9 texture lookups that sampled data from the original wireframe in the first prototype and instead re-using the sampled depth.
The result can be seen above...
After I managed to get the desired effect I could simplify it significantly. Moving from two render-passes to one and from 18 texture look-ups to 'just' 9. This was possible by removing the normal 'diffuse' pass which is nothing more than the regular colored wireframe you can see in the video (when the halos are toggled-off), and instead using the information available inside the depth-buffer to construct the wireframe. This is pretty easy if you take into account that if (depth == 1) there is no geometry, where if (depth < 1) there is in fact a line that was drawn when constructing the depth-buffer. From this you create a colored wireframe and the halo inside the post-processor. The same data can be used to determine intersecting lines...removing the need for 9 texture lookups that sampled data from the original wireframe in the first prototype and instead re-using the sampled depth.
The result can be seen above...
Saturday, 14 May 2011
Prototype: Orientation-Adapative Grid
"Orientation adaptive Grid" is a concept I drew up earlier this week and I finally turned it into a working prototype yesterday. There really isn't a lot to talk about - It reacts to the orientation of the camera and shows/hides the three available grids. The video below demonstrates this in a few seconds...
(watch is high-quality to see the lines)
I'm not quite sure if I will be using this in the later stages of my editor - so far it goes look kinda cool and doesn't seem too distracting - it will require some more tuning (of the alpha values) and once the ViewCube (seen in the top-right corner) is complete I will revisit this concept as they play pretty well together.
(watch is high-quality to see the lines)
I'm not quite sure if I will be using this in the later stages of my editor - so far it goes look kinda cool and doesn't seem too distracting - it will require some more tuning (of the alpha values) and once the ViewCube (seen in the top-right corner) is complete I will revisit this concept as they play pretty well together.
Monday, 2 May 2011
Editor Tool: ViewCube (Camera Orientation helper)
Got to work on a new tool today and to users of 3D Studio Max or Maya it may look very familiar. It's called the ViewCube and it helps you orientate your camera in the scene. The video below demonstrates the basic system, Right now it's still only a prototype I made earlier this evening and I will finish it at a later time. The final tool will interpolate to the new position/orientation and the tool itself will be available in the top-right corner of the screen (and will have greatly improved visuals of course ;)).
Since I only have one viewport available in my editor, this can theoratically be a replacement for the standard dedicated Top/Side/Front-viewports. I might add an easy toggle for perspective-to-orthographic so you would not longer need/have 4 viewports on your screen at the same time...
Since I only have one viewport available in my editor, this can theoratically be a replacement for the standard dedicated Top/Side/Front-viewports. I might add an easy toggle for perspective-to-orthographic so you would not longer need/have 4 viewports on your screen at the same time...
Tuesday, 29 March 2011
SgMotion: Rig/Skeleton Visualizer
A couple of days ago I added a new feature to the SgMotion animation library.
It visualizes the animation skeleton to debug animation and rigging issues and helps finding bone/dummy names and indices more easily.

It visualizes the animation skeleton to debug animation and rigging issues and helps finding bone/dummy names and indices more easily.

You can grab the latest release for SgMotion over at codeplex.
An example of how to use this new feature is available inside the Sample project.
As an added bonus you can cycle through the skeleton to highlight bones and their children, watch the video to find out exactly what I mean.
Wednesday, 2 March 2011
Console Extension - Auto-complete & Suggestions.
I actually finished this last night, but I didn't post about it and decided to get some sleep instead. It's an extension on the console component I integrated a few weeks ago. It adds support for auto-complete and command suggestions. I might add an argument-completer as well in addition to some layout fixes.
(watch in HD 720p + fullscreen to read the text)
I originally got this idea from the UDK console that has a similar feature, it should make browsing and finding commands much faster and easier and doesn't rely on software knowledge as much.
It's based on the GameConsole by Vos which I believe is one of the best console component for XNA.
(watch in HD 720p + fullscreen to read the text)
I originally got this idea from the UDK console that has a similar feature, it should make browsing and finding commands much faster and easier and doesn't rely on software knowledge as much.
It's based on the GameConsole by Vos which I believe is one of the best console component for XNA.
Saturday, 26 February 2011
XNA 3D Gizmo Video!
Finally a video about the Gizmo showcasing the feature-set. I've added some tunes as well this time, hope you like it...
Monday, 31 January 2011
Gizmo Update (no release yet)
I have been working on a completely new Gizmo. The old one did what it has to do, but it lacked feedback for the user and didn't look very professional.
The new release, should be the (near) final iteration of the project. I still don't know exactly when it's going to be finished, but I've made a lot of progress today.
Currently, only the Translation part of the gizmo is in place. But like the previous version, rotation and scaling will be supported.
Friday, 7 January 2011
Updated 'Over Night' Trailer on Youtube
I've just finished updating the trailer of our previous project, 'Over Night'. It includes a new voice for Jake, the protagonist and higher quality in-game footage. The previous upload suffered greatly from compression artefacts. This issue has been resolved and the overall quality of the footage has been greatly improved.
For anyone wondering if this means the project is still on-going, I'm afraid I'll have to disappoint you. I've updated the trailer so I can include it in my Portfolio. More on that later...
Wednesday, 13 October 2010
Editor Update: Clone-tool with ClonePreviewer
You can simply drag your clone to the desired location while using the scroll-wheel to determine the amount of clones you like. The process is finalized by pressing the Enter key.
The preview models share the same instance of the source model, rendered with an offset for each clone. The translation is snapped to the current grid size, alternatively you can use precision-mode (Shift) to fine-tune your clone-offset. Works with any type of placeable entities, however entities without a model (particles etc.) use simple boundingboxes/icons to show their destination. This may change in the future, where even particles may be fully rendered while previewing.
The preview models share the same instance of the source model, rendered with an offset for each clone. The translation is snapped to the current grid size, alternatively you can use precision-mode (Shift) to fine-tune your clone-offset. Works with any type of placeable entities, however entities without a model (particles etc.) use simple boundingboxes/icons to show their destination. This may change in the future, where even particles may be fully rendered while previewing.
Sunday, 10 October 2010
Effortless Waypoint & Path creation using 3D-Sketching
About 3 weeks ago, I demonstrated the Sketching in 3D Tool. Today I went a little further and expanded it to be able to create waypoints and paths for our upcoming levels without effort. Manually placing waypoints can be a tedious task, especially if your level is continuously changing in its early stages. With this new Tool we'll be able to create full AI paths in seconds, with easy tweaking after the initial waypoints are setup.

Currently there are two types of lines. WaypointLines and AvoidanceLines, the latter is used to state certain parts should simply be avoided by the AI or to break paths that are too close to geometry or ledges.
Monday, 27 September 2010
Triangle-precision ray collision
Bullet collision was previously calculated using the triangle mesh capabilities of BEPU. This wasn't going to work efficiently with all the separate meshes that are going to be used in our levels. With the basics of triangle-picking already implemented in the editor tools it didn't take a lot of time to get a basic prototype up and running. In the image below you can see the new filtering algorithm.


each "group" (1 big sphere, 8 small ones) contain 41k polygons. (click image to read the text)


In a regular scene with a higher amount of objects with lower polygons per mesh that are spread across the scene, the optimization methods will become more efficient. This will be tested once the prototype level is complete.
The main focus of the new filtering system is excluding hidden models before they enter into the per-triangle collision check. This system is added on top of the bounding-sphere filter that was already present in the editor tool.

Overkill? 150 million triangles both rendered and tested against the bullet ray. This clearly wasn't going to run smoothly (roughly 0.1 fps)
Video:
(use 720p and fullscreen to read the filtering info in the topleft corner)
Saturday, 18 September 2010
Engine Update: Sketching in 3D

Over the past 2 months I haven't posted a lot of news. With the new project up and running (kick-off was the 13th) I'll start doing more regular postings like I used to.
With the project details still being worked on, there is some time to develop tools that should make life easier later on in the development stage. So I decided to work on some odd ideas that I came up with while traveling. The first one is a pretty cool feature, its sketching in 3d. It uses the 3d meshes inside the level as a canvas to draw on. I think this is very useful for level designers and to help process play-testing feedback.
For this particular feature to work, triangle precision ray-testing was required. Luckily the XNA Creators Club had a sample project to get me started. The lines are made of vertices combined into a LineStrip. In addition the triangle normal is tested against the ray direction to prevent drawing on back-faced triangles.
While implementing triangle-precision picking I updated the Gizmo so it is now able to select models by triangle instead of the small boundingbox. Being used to 3D studio max' selection methods I decided to implement multi-layer selection. Because that name probably makes no sense, I'll try to explain it. If multiple objects are behind one another, clicking multiple times will select the object behind the previously selected object, clicking again will select the one behind it etc. That means you can select any object even if another is blocking your view.

Each click will pass through another "layer" and select the object occluded by the one in front.
Sunday, 11 July 2010
Core Engine: Creating a simple level (Video)
I'm back with another video, this time I'll show you the creation of a (very) simple level. With The purpose of demonstrating some of the new additions, including the Animation Editor and the updated Visual Scripter. The video playback speed is set to x2 to reduce the overall length. Hopefully you'll enjoy watching and get a bit of insight in the engine's development capabilities.
The menu system shown in the video above is a WIP, originally all level objects were added at build-time. It's a big change in overall engine design to get these things working flawlessly with the new system. The core is aimed at rapid development and tweaking of the game/level while playing. It's been like that since day one and the new system should compliment that, increasing flexibility of the engine and speeding up the overall process of creating games.
Thursday, 8 July 2010
Visual Scripting Editor (Video)
It's 6:45 in the morning and the scripting editor is finally ready for a short demonstration. Spend most of the time cleaning up the node-system and made it a LOT easier to add additional node types in the future. The scripts are now directly stored inside the level file and can be stored separately if desired (for re-use in other levels)
(Watch in HD & Fullscreen!)
In the video you will see two simple scripts, one animating a box and the other toggling a point light on and off. You'll also see the new Level Manager window, more on that later.
(Watch in HD & Fullscreen!)
Sunday, 20 June 2010
Engine Update: Scripting, ReverbVolume & Tracking Window
The first one is the ReverbVolume as seen in other game engines like Unreal Engine 3. The volume is very useful when defining rooms,allowing you to alter sound properties when either inside or outside of the volume. The volume alternation is already working when inside or outside of the volume, ironically the only thing that is not yet in place is the Reverb effect itself. I'll explain ReverbVolumes a little more in-depth later on once I've completed finished it, hopefully including the actual Reverb effect instead of just the volume/pitch modifiers. In the video on the bottom you can see/hear it for yourself.


The white box is the reverb volume, the blue circles are ambient sounds emitters (or actually the radius of the emitter)
Another concept I've been experimenting with is a sort of Tracking Window (or output/clipboard window) It's an additional (and optional) window that you can use to print out useful information. You can choose to print it as a static string. As a sort of clipboard/memory aid to help with Vector positions or pretty much any piece of info you may need to remember in runtime. If it were nothing more than that, it would pretty much be an in-editor notepad...So I added something I like to call "live-tracking" (or real-time tracking, or just tracking...) You can use the tracking feature to keep track of any property an object may have (positions, rotations, scale, volume, pitch, visbility etc.) the window uses a series of Slots that can be filled with one traceable object each. Most of it is already working, I'll have to spend some more time on it to add every little detail. Eventually I'd like to have each slot assessable and allow user input to change any of the properties that is being tracked by the window. You can see a sneak preview of it in the video below.
Another concept I've been experimenting with is a sort of Tracking Window (or output/clipboard window) It's an additional (and optional) window that you can use to print out useful information. You can choose to print it as a static string. As a sort of clipboard/memory aid to help with Vector positions or pretty much any piece of info you may need to remember in runtime. If it were nothing more than that, it would pretty much be an in-editor notepad...So I added something I like to call "live-tracking" (or real-time tracking, or just tracking...) You can use the tracking feature to keep track of any property an object may have (positions, rotations, scale, volume, pitch, visbility etc.) the window uses a series of Slots that can be filled with one traceable object each. Most of it is already working, I'll have to spend some more time on it to add every little detail. Eventually I'd like to have each slot assessable and allow user input to change any of the properties that is being tracked by the window. You can see a sneak preview of it in the video below.

The tracker window is tracking the positions of 3 objects in the scene.
The last thing I worked on today was a basic scripting/event system. In both "Needle Juice" & "Over Night" the event code got really messy over time, requiring a lot more time to find anything...which is a complete waste of time, especially when you're nearing the end of a project. In order to prevent this from happening again I need to have a solid and clean system to handle events and scripts. So far I redesigned the TriggerVolume class used for any positional triggers and added support for Enter/Leave Volume events. To test the new system I made a (simple) script that opens and closes a door when the player approaches.
All of the described features above are shown in the short video below. Make sure to turn on your sound, because the reverbvolume can only explain itself with sound ;)
The last thing I worked on today was a basic scripting/event system. In both "Needle Juice" & "Over Night" the event code got really messy over time, requiring a lot more time to find anything...which is a complete waste of time, especially when you're nearing the end of a project. In order to prevent this from happening again I need to have a solid and clean system to handle events and scripts. So far I redesigned the TriggerVolume class used for any positional triggers and added support for Enter/Leave Volume events. To test the new system I made a (simple) script that opens and closes a door when the player approaches.
All of the described features above are shown in the short video below. Make sure to turn on your sound, because the reverbvolume can only explain itself with sound ;)
The first sound you hear is that of a bar, the second is a bit more difficult to hear, it represents the streets just outside of that same bar. when you move through the door, the indoor sound will fade to a lower volume while the street ambient becomes more noticeable.
Saturday, 12 June 2010
Over Night: Official Trailer Released!
The first official gameplay trailer of "Over Night" a game made in XNA.
The game was created within 8 weeks with a team of 4 students (and some additional outside help, see below for the full team setup)
The Team:
Mitch Manders (Design & Modeling)
Jorry Rosman (Concept Art & Textures)
Bas Babroek (Game Programming)
Tom Looman (Engine/Tech Programming)
Special Thanks to:
Paul van Gent (Audio)
Marvin Nooitgedacht (Video Editing)
Davy Jacobs (Animation)
Bo van Oord (Desert Eagle modeling, textures & animation)
Jeffrey van der Heul (Modeling)
Subscribe to:
Posts (Atom)