Showing posts with label Editor. Show all posts

Monday, 5 December 2011

EditMesh Submode & History Panel


It was about time I posted a new video about my progress, so I decided to create a very early preview of some of the new features. This includes an early version of the history panel and the improved mesh editing feature.

If you're familiar with Neoforce you may recognize it in the video video. If you don't, it's basically a Winforms-like library with tons of features for 2D menus. It has quite an exhaustive feature-list and will replace all my previous Winforms based panels/windows. One big advantage of using Neoforce is alpha support, something not easily accomplished using regular Forms. Another advantage is in its design, instead of using OnPaint events and event handlers, it has regular Update and Draw functions. This is really nice when you're creating transitions and smooth animations for your controls.


There are some other features hidden in this video, one is still in very early development. You might have seen the screen fading from and to black several times, that is part of it ;) The best way to describe it: a method to quickly access your panels, menus, assets etc. through a single hotkey (spacebar by default) As you can see in the video, I 'pinned' the history panel to my game window, keeping it active when leaving the screen overlay. I will talk more in-depth about this video once it's more developed.

Saturday, 5 November 2011

Gizmo update coming soon!

Hi guys, just wanted to let every XNA3DGizmo user know that a update is currently being developed. I noticed that the original implementation had some sloppy shortcuts that could make it more difficult to implement if you were unfamiliar with the code. This included references to the Engine class among other things.

So I decided to improve things by removing any reference to outside classes (including InputState which is no longer required) I realized this update is necessary as even I found it difficult to implement the gizmo in a new project and wasn't a simple drag&drop operation as it should be (or as close as possible to it) this made it obvious some improvements were required to the public version.

The last public update was quite a while back and I was using a modified version with already several improvements implemented (such as multiple type of objects you can select as shown in the Vertex Manipulation Video where I select both scene objects and vertices with the same Gizmo component)


So in general the upcoming update should make it much easier for everyone to implement this gizmo into his own code/editor. If you had trouble integrating it, please let me know. There is no current ETA on therelease, but I'll try to do it sooner than later...

Monday, 4 July 2011

Vertex Manipulation [Compound objects]

Just a short update on what I've been working on this time. It started when I was playing CoD:WaW this afternoon and I noticed a lot of debris and broken walls which got me thinking about how they managed these kinds of assets. This intrigued me, so I started drawing up some ideas on how I could potentially add this to the toolset, with little knowledge on mathmatical geometry or destruction calculations I tried to start things simple and look for existing online resources.

I will go into much more detail on this topic at a later time, for now I'd just like to share a few images and give notes on what you see.

ray vs. triangle collision. white lines visualize an array of lines from the camera eye colliding with the geometry.

The box-mesh on the left was used to cut 4 holes into the plane-shape.

The wireframe of the same scene, visualizing the triangles of the triangulated plane.

A hole cut by defining 5 vertices by colliding a ray with the plane, these were defined at runtime from the camera-eye.

I'm also looking into 'bridging' (users of 3D Studio Max may know what I'm talking about) to fill the gap between two planes of a wall (its back and front) after cutting a hole with the triangulator. Some basic box uv-mapping and a noisy texture to simulate broken concrete (or any other material) and you should have the basics to quickly create holes in walls or break chunks of the scene's meshes. The resources I used are listed below. Much more on this at a later time, there is still a lot to do and even more to talk about :)

Resources

App Hub - Triangle Picking Sample

Nick Gravelyn's Triangulator (2D)

Triangulation By Ear Clipping - by David Eberly

Sunday, 26 June 2011

Vertex Manipulation (Mesh-editing)

Editing models inside my engine has been something I wanted to support for a long time now. Especially when you're not the one creating the assets, but do have to work with them inside the editor it can be time consuming to send back a model with incorrect material names or a mesh that should be split to optimize rendering, or vice versa. With this tool I will eliminate the need to have artists re-export their models because of tiny mistakes/changes and should provide a much cleaner pipeline in general.


Currently only the very core of this feature has been implemented (as seen in the video) and a lot of other stuff is still to follow, I will give a brief overview of how the fully functional tool should work once its complete. When any new model (.fbx or .x) is imported, it's processed by the content pipeline and turned into an .xnb file, an .xml file will be attached to the source (model) file that contains all changes to the model and will be processed during build-time. By default this .xml file is empty and nothing altered, during run-time a mesh can be converted to Editable Mesh (trying to keep this similar to 3D Studio Max's naming conventions) which allows vertex and triangle selection with support for any type of transformation that is supported by the gizmo component (translate, rotate, scale in local- and world-space) these transformations are stored inside Actions (I will talk about Actions a lot more at a later time, but it's basically what you use to support undo/redo in any kind of editing software) and written to the model Xml. The model is then re-build the next time the project is build and the actions are applied, this can hold any type of alteration including material renaming, splitting meshes and deleting / adding new vertices alongside vertex transformations.

Because the source model remains untouched, whenever the model is re-exported from any DCC-tool like 3D Studio Max or Maya the model will still build with all transformations and alterations applied. An example: A material named '#46 Material' is renamed at run-time to 'corridor_floor', if the artist then changes the name of '#46 Material' to 'corridor_floor' or something else in the source model, the run-time change is ignored because the original material name (#46 Material) can no longer be found... in a worst-case scenario this ignores the material properties you stored for the original name (material properties are stored elsewhere, so no data is actually lost) so even in the worst case, you are only a small step away from re-applying your previous changes (A warning dialog with failed conversions should help with this, making it potentially very quick and painless to manually re-assign the changes that are never lost, just ignored till resolved) The same applies to vertex transformations, but these can be a bit more difficult to keep track of once the indices of a certain mesh change inside the .fbx source file.

There is still a significant amount of work that has to be completed before this feature takes it full shape, with this first proof of concept up and running I believe it will be a very valuable tool to have available, and a lot of fun to create :)


It proved to be quite easy to convert the gizmo to support vertex manipulation (and selection) I will add these changes to the codeplex project at some point in the future...

Saturday, 21 May 2011

'Depth Dependent Halos' for Wireframe rendering [Part 2]

I have been working on getting the depth buffer to generate properly and using it to post-process the wires (i.e. creating the outline around the wireframe) and so far I'm quite satisfied...it's still a work in progress, but progress is going well...


This is the result so far, with the depth buffer drawn in the top-left corner and the final image in the middle. 


A zoomed-in version of the first image, the effect is visible around the characters head where you see a clear outline being formed, disconnecting it from the other character underneath it. 

For comparison I used a color similar to UDK (see first image of previous post)

4 more texture-lookups will be added which adds improved support for diagonal lines - that would bring the total lookups to 14...which is quite a lot for a single effect, but since the geometry will never been drawn with fancy shaders while in this 'mode' (nor any other post-process effect) I don't expect it to be a problem. This effect provides the most benefit when moving around with the camera, I hope to upload a short video of this after I finalized the effect.

'Depth Dependent Halos' for Wireframe rendering

'Depth Dependent Halos' is something I read on the UDK site a while ago, it's for their 'new' (by now pretty old...) wireframe rendering that increases readability of the lines for complex scenes. I was kind of wondering how they accomplished this and wanted to try this out myself (I was working on a wireframe-mode anyway, so it was the right time to experiment)


This is the effect I am trying to replicate. Black halos are drawn around the wireframe lines to provide a better understanding of depth differences between these lines.

I went through a few different approaches and ended up with a small post-processing shader that applies the halo around the wireframe lines. It took a few iterations to get the desired results, but I did end up with something that is pretty close to what I am looking for...

The first step was to create my regular wireframe and letting the post-processor create a small single pixel halo around these lines using a different color. The second step (still have to start on this one) will require a depth-buffer and use the depth information to determine if the outline/halo should be drawn with halos being drawn on top of lines underneath them, creating discontinuities between lines that intersect and are underneath others.

Some of the iterations I went through:


Trying to find out the correct pixel offset and coloring by finding edges and applying a different color to each direction (up/down/left/right in screen-space)

This is the current state of the code, and resembles the desired effect (of step 1) quite closely.


I have also been working on some additional scene navigation features. These are best shown in a video, but since I currently get my connection through a painfully slow USB stick - that will have to wait...

bonus image...(this result was less then expected, but looks pretty cool)

Saturday, 14 May 2011

Prototype: Orientation-Adapative Grid

"Orientation adaptive Grid" is a concept I drew up earlier this week and I finally turned it into a working prototype yesterday. There really isn't a lot to talk about - It reacts to the orientation of the camera and shows/hides the three available grids. The video below demonstrates this in a few seconds...


(watch is high-quality to see the lines)

I'm not quite sure if I will be using this in the later stages of my editor - so far it goes look kinda cool and doesn't seem too distracting - it will require some more tuning (of the alpha values) and once the ViewCube (seen in the top-right corner) is complete I will revisit this concept as they play pretty well together.

Monday, 2 May 2011

Editor Tool: ViewCube (Camera Orientation helper)

Got to work on a new tool today and to users of 3D Studio Max or Maya it may look very familiar. It's called the ViewCube and it helps you orientate your camera in the scene. The video below demonstrates the basic system, Right now it's still only a prototype I made earlier this evening and I will finish it at a later time. The final tool will interpolate to the new position/orientation and the tool itself will be available in the top-right corner of the screen (and will have greatly improved visuals of course ;)).

Since I only have one viewport available in my editor, this can theoratically be a replacement for the standard dedicated Top/Side/Front-viewports. I might add an easy toggle for perspective-to-orthographic so you would not longer need/have 4 viewports on your screen at the same time...


Thursday, 10 March 2011

Visual Script 2.0

The above image contains the new (WIP) V-Script tool. It's much like the old script tool, working with Nodes similar to many other node-based frameworks out there. However, this new tool is build from the ground up and should end up with a much cleaner structure and higher flexibility. It will include Xbox 360 support, something that the old wasn't designed for.

As you can see above, I have most of the basics worked out. A cool feature that I added today is auto-alignment, this basically structures the connectors automatically and re-sizes the Node if necessary. The old system required you to manually place all connectors, which proved to be a pain for the more complex script-nodes that were added late in development. 

One last thing you can see is the new menu inside the XNA Game Window. There aren't captured by Fraps, so you couldn't see them in my last video while it was already implemented back then. It's still only a small proof of concept, it's a context-based menu that changes depending on what you've selected and/or are working on (particles, scripts, object-placement etc.) note that the gray bottom-bar (that is currently empty) will include info about the editor and gizmo properties etc.

Wednesday, 2 March 2011

Console Extension - Auto-complete & Suggestions.

I actually finished this last night, but I didn't post about it and decided to get some sleep instead. It's an extension on the console component I integrated a few weeks ago. It adds support for auto-complete and command suggestions. I might add an argument-completer as well in addition to some layout fixes.


(watch in HD 720p + fullscreen to read the text)

I originally got this idea from the UDK console that has a similar feature, it should make browsing and finding commands much faster and easier and doesn't rely on software knowledge as much.

It's based on the GameConsole by Vos which I believe is one of the best console component for XNA.

Tuesday, 8 February 2011

Gizmo Beta Released!

It's finally here...well kinda. It's still in Beta, but a lot of its functionality is working and now you can try it out for yourself on CodePlex.

There are some known issues (including local-space transformations not working as intended) but I really wanted to let you guys try it and see what you think of it.

The component has been re-built from the ground-up to eliminate all of the old issues and improve readability and flexiblity of this new revamped component. Feedback and suggestions are welcome, you can post it in the comments or leave a message on Codeplex instead.

I'll leave you with just this image and a download link for now, a video will follow once I have a fully stable build.


Since I'm finally using SVN, you can directly follow my updates on the Source Code tab of codeplex.

Monday, 31 January 2011

Gizmo Update (no release yet)

I have been working on a completely new Gizmo. The old one did what it has to do, but it lacked feedback for the user and didn't look very professional.

The new release, should be the (near) final iteration of the project. I still don't know exactly when it's going to be finished, but I've made a lot of progress today.

Currently, only the Translation part of the gizmo is in place. But like the previous version, rotation and scaling will be supported.

Wednesday, 13 October 2010

Editor Update: Clone-tool with ClonePreviewer

You can simply drag your clone to the desired location while using the scroll-wheel to determine the amount of clones you like. The process is finalized by pressing the Enter key.

The preview models share the same instance of the source model, rendered with an offset for each clone. The translation is snapped to the current grid size, alternatively you can use precision-mode (Shift) to fine-tune your clone-offset. Works with any type of placeable entities, however entities without a model (particles etc.) use simple boundingboxes/icons to show their destination. This may change in the future, where even particles may be fully rendered while previewing.

Tuesday, 12 October 2010

Creating Line-based Animations with the SketchTool

A Proof of Concept to animate objects, particles and lights using the Sketch tool.

The position and normal (of the colliding triangle) and stored and converted to an animation file (shared with the already built-in Animation Editor). These can be plugged into any script to easily animate objects, lights or particles in the environment.

Sunday, 10 October 2010

Effortless Waypoint & Path creation using 3D-Sketching

About 3 weeks ago, I demonstrated the Sketching in 3D Tool. Today I went a little further and expanded it to be able to create waypoints and paths for our upcoming levels without effort. Manually placing waypoints can be a tedious task, especially if your level is continuously changing in its early stages. With this new Tool we'll be able to create full AI paths in seconds, with easy tweaking after the initial waypoints are setup.


Currently there are two types of lines. WaypointLines and AvoidanceLines, the latter is used to state certain parts should simply be avoided by the AI or to break paths that are too close to geometry or ledges.

Saturday, 18 September 2010

Engine Update: Sketching in 3D


Over the past 2 months I haven't posted a lot of news. With the new project up and running (kick-off was the 13th) I'll start doing more regular postings like I used to.

With the project details still being worked on, there is some time to develop tools that should make life easier later on in the development stage. So I decided to work on some odd ideas that I came up with while traveling. The first one is a pretty cool feature, its sketching in 3d. It uses the 3d meshes inside the level as a canvas to draw on. I think this is very useful for level designers and to help process play-testing feedback.


For this particular feature to work, triangle precision ray-testing was required. Luckily the XNA Creators Club had a sample project to get me started. The lines are made of vertices combined into a LineStrip. In addition the triangle normal is tested against the ray direction to prevent drawing on back-faced triangles.

While implementing triangle-precision picking I updated the Gizmo so it is now able to select models by triangle instead of the small boundingbox. Being used to 3D studio max' selection methods I decided to implement multi-layer selection. Because that name probably makes no sense, I'll try to explain it. If multiple objects are behind one another, clicking multiple times will select the object behind the previously selected object, clicking again will select the one behind it etc. That means you can select any object even if another is blocking your view.

Each click will pass through another "layer" and select the object occluded by the one in front.

Tuesday, 7 September 2010

Level & Content management [Part 3]

I got a question about my level and object management recently and was asked if I could talk about it. So in this post I'll explain my old and current method of dealing with (level) serialization and how I combined it with my game editor.

A few months ago I created my levels using a hybrid implementation of a level editor and code to create and connect objects. A game would have several "Scene" classes to be filled with Entities and later set at the correct position in 3D space using the level editor. This worked pretty well, especially since our team had limited time to work on our projects (8 weeks) so I wasn't able to create a fully featured editor at the time. One advantage was the ease of setting up connections and events between objects in a level, because everything is available in the Scene class. An obvious disadvantage was the inability of adding objects on the fly (in runtime) it required some planning to work efficiently. With the game Needle Juice there was only a limited about of objects that required the use of the editor, so again, a fully featured editor wasn't necessary.

However, after completing Over Night I set aside some time to work on a more complex editor to aid in the upcoming project(s). This meant a new way of serializing the Scene to store any data. This new method will be explained below, with some code snippets. On a side-note I strongly recommend looking at existing editors (like UDK) Fool around with it, learn its basics and see what fits your needs and what doesn't. I occasionally opened up an existing Unreal Tournament 3 map and messed around with it to hunt for new features. If you're the only developer to use that tool you can mold it to your exact specifications and preferences very easily.

Before I go on, the following is in no way the only or the best way of doing it. It worked for me and should be easy to implement for yourself. It will hopefully give you a clear idea of you can combine your own requirements with the examples shown.

First off, any object that exists in my level is an ISceneEntity (interface) with a Position, Rotation, Scale etc. The interface holds data that is necessary for any object in the world. Any class that derives from this interface or any other subclass may have its own properties that need to be serialized as well. That means a flexible serializer is required. Luckily Shawn was so kind to explain everything you ever wanted to know about IntermediateSerializer. I recommend you read through his article.

To store all data in your level your engine needs to know what to serialize and what to ignore. I use a fairly simple Level class to keep track of any objects currently in the world (and part of the serialization list) You add your Entity to a List in your Level class. The IntermediateSerializer will go through the list and store all Entities in an Xml level file.
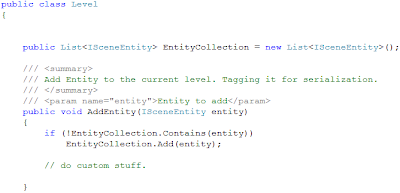
To actually store your level you need to call the IntermediateSerializer.Serialize() to write all of the level data to your disk.
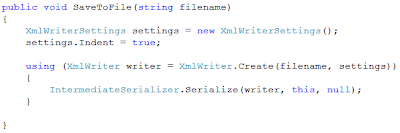
The above method is part of the Level.cs class.

If you're following along, don't forget to add the Microsoft.Xna.Framework.Content reference to your project folder. By default its already part of your Content project, when referencing in code, you need to add it to your game project as well. The IntermediateSerializer class is part of the Microsoft.Xna.Framework.Content.Pipeline.Serialization.Intermediate namespace.

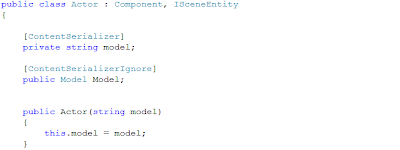
Your level is now stored on disk. Some class will require setting some Attributes in order to be stored properly. Use the [ContentSerializerIgnore] Attribute over any public property that you want excluded. Use the [ContentSerializer] Attribute to include private or protected variables.
Finally to load all of your previously stored data you need to call IntermediateSerializer.Deserialize(). For more info I recommend reading through some of Shawn's articles about it.

I was going to talk about a new feature (mentioned in my previous post) that allows preloading of assets, reducing overall idle-time. This post is already long enough so I'll keep it in mind for some other time.

I hope this helps anyone looking to create his own editor. Level serialization isn't a complex operation, the most important thing is properly structured component system. If you have any questions you can post your comments in the comment section below.

Sunday, 29 August 2010

Engine Update: New Features & Tools!

It's been a while since my last post. That means I had a lot of time to add new features and spend more time on existing features as well. I'd like to include them in a video soon, for now I'll do a quick rundown of the most important new additions to the engine.

Preloading of Assets
Load Models, Textures, Video, SoundEffects in the background (Separate Thread) before the complete level is setup. The engine reads part of the level file and pulls out all the required assets for the upcoming level and load them before the game initiates a level transition.


Undo/Redo system
I Finally took the time to integrate this into the editor. For now it works primarily on SceneEntities (anything part of the level) and can undo translation/rotation/scale.


System messages
The system will "ping" important messages and warnings to the top-left corner of the screen, warning you of possible errors. (See above)

Game Properties Window
Allows you to set Engine properties as well as user-defined game properties, very useful when debugging.


3D Text Buttons
Selectable by mouse, useful for either ingame activators or 3D menus. Text is baked into a texture at runtime and stored on disk.


Improved Object placement
It's now possible to add objects using the Quick-menu (right-click popup) objects will be placed on the position the mouse is pointing in 3D.

Maya style navigation/orbit camera
Holding down "L"-key will orbit the currently selected object, scroll-wheel will zoom in/out.

VisualScript & AnimationEditor improvements
Added a lot of new Node-types and added the ability to directly add an animation to a new script.


Material editing inside VisualScript
All (Sunburn) material effects are stored and can be accessed using Script Nodes. Useful to dynamically set textures and other shader properties etc.

File browsing inside VisualScript
to easily attach files (Textures, Models, Levels etc.) to a Script Node.


I consider these the most significant changes/additions to the engine. Other things will show up in the next video.

Soon a new project will launch, lasting 4 months in total (instead of the previous 8 weeks we were given when building OverNight & Needle Juice) It's targeted towards XBLIG (Xbox Live Indie) and should be the first game to be fully developed (previous projects were prototypes, not full games) and released on that channel. I'm looking forward to get started, and will of course update on the progression of the game...

Wednesday, 28 July 2010

Engine Update: Shaders & Editor Additions

It has been a while since my last update. The image below shows some of the things I've worked on these past few days...


So what's new? First off, the shaders might have caught your attention, the lava is flowing and the arrows are flashing which you can't see in the still image unfortunately, I'll make sure to include them in the next video. They were really just experiments to get some practice with shaders and was hoping to use it for a material editor I was working on (had to put it on hold for now) Still, I think they look pretty cool (especially when you see them in motion)

The next thing you can see on the image is the ContextMenu (pop-up menu that appears when you right-click) Its part of the Editor and is rendered inside of the XNA Game window. XNA is still running as it is used to, winforms is added to the XNA window not the other way around.
As you can see there are several useful options inside this pop-up window. You can quickly add new Entities, add selected entities to your current script and continue playing or restart the level using the changes you made in edit-mode.

Hopefully I'm able create another video soon, showcasing some other additions that were added over the past couple of weeks. In the meanwhile I'm working on a game prototype, this directly aids in build the engine as well...

Sunday, 11 July 2010

Core Engine: Creating a simple level (Video)

I'm back with another video, this time I'll show you the creation of a (very) simple level. With The purpose of demonstrating some of the new additions, including the Animation Editor and the updated Visual Scripter. The video playback speed is set to x2 to reduce the overall length. Hopefully you'll enjoy watching and get a bit of insight in the engine's development capabilities.


The menu system shown in the video above is a WIP, originally all level objects were added at build-time. It's a big change in overall engine design to get these things working flawlessly with the new system. The core is aimed at rapid development and tweaking of the game/level while playing. It's been like that since day one and the new system should compliment that, increasing flexibility of the engine and speeding up the overall process of creating games.