Showing posts with label Engine. Show all posts

Monday, 5 December 2011

EditMesh Submode & History Panel


It was about time I posted a new video about my progress, so I decided to create a very early preview of some of the new features. This includes an early version of the history panel and the improved mesh editing feature.

If you're familiar with Neoforce you may recognize it in the video video. If you don't, it's basically a Winforms-like library with tons of features for 2D menus. It has quite an exhaustive feature-list and will replace all my previous Winforms based panels/windows. One big advantage of using Neoforce is alpha support, something not easily accomplished using regular Forms. Another advantage is in its design, instead of using OnPaint events and event handlers, it has regular Update and Draw functions. This is really nice when you're creating transitions and smooth animations for your controls.


There are some other features hidden in this video, one is still in very early development. You might have seen the screen fading from and to black several times, that is part of it ;) The best way to describe it: a method to quickly access your panels, menus, assets etc. through a single hotkey (spacebar by default) As you can see in the video, I 'pinned' the history panel to my game window, keeping it active when leaving the screen overlay. I will talk more in-depth about this video once it's more developed.

Friday, 23 September 2011

Image Collection

I haven't made a lot of progress recently on the engine due to my internship (completed) and the start of the new school year (my last) I did make some screenshots a while back when I was working on flares and terrain texture mapping. Below a small assorted list of the things I did.


With the terrain texturing I tried to minimize stretching on steep surfaces without using the tri-planar technique, there were some difficulties and I don't have a finalized method yet. The red/green colors on the terrain indicate UV coordinates, the lines are the surface normals and the yellow text displays the vertex number in the VertexBuffer. I hope this can at least somewhat fill the major gap in between posts recently, hopefully I can do some cool stuff again soon like working on the mesh editor from my previous post.

Tuesday, 14 June 2011

Environment Mapping (w/ Normal Maps)

A while ago I was trying to get Environment maps (aka Cube-maps) to work with SunBurn's Deferred renderer with reasonable success. Last week I had a go at it again, this time in my own renderer, because the normal-mapping information was already available inside the shader it was relatively easier to do this time around (along with all the problems I have already solved the first time)
It was supposed to be a transparent (forward)-effect for windows etc, but somehow turned into an opaque cube-mapped deferred shader...Not sure how that happened :)

Below you can see what the shader looks like at the moment, where the first two images show the 'forward' shader and the last two use the deferred shader (which includes pointlights, specularity etc.) The forward shader will be modified so it supports alpha-mapping, what it was originally designed for anyway.

Forward shader - environment map, with normal map and simple directional light.

Forward shader - similar setup as above.

The deferred shader - with pointlight on the left and right (with very strong colors to highlight the effect)

Deferred shader - with the deferred rendertargets (LoR: color, normals,depth,lighting)

The next step is to further develop the forward rendering pass, for transparency mostly. This includes depth-sorting of the objects along with Composite Lighting that calculates approximate lighting for objects that don't support deferred shading.

Resources:

Custom Model Effect XNA Sample - Source for the cube-map processor and the basics for the environment mapping shader.
Shawn Hargraves on Cube-mapping - Some interesting bits about cube-mapping, closely tied to the XNA sample above.

Sunday, 1 May 2011

Engine Restructuring

So I have actually had the time to work on the engine again and been experimenting with some design patterns. Since the deadline of our latest project (Project Sunburn) has passed a while ago I have been doing some experimental stuff, mostly to try and fix issues and concerns that were bugging me for a while. Since there are currently no new projects/games scheduled to use the engine I am basically free to experiment and try out new things.

A pretty major annoyance is 'one-frame-lag', it's fairly common and can easily happen when you don't own full control over the optimal update-order of your components. This type of lag most commonly occurs when object-A affects object-B, but B has already updated himself that frame. It will then take another frame for the full-effect to be applied. The same thing can happen when different objects query information from a object that itself gets affected several times during a frame, this ends up being messy and will have unexpected results and one-frame-lag.

However, I believe to have found a pretty solid solution, since it a bit experimental I will first test it against more complex components. More on that later...

The latest version of Core Engine was also lacking a proper Game-State management framework, which wasn't a problem for a long time since we generally didn't use 2D menus for our prototypes, but I am currently figuring out a good way to re-integrate this into the engine (from scratch) The 'standard' frameworks really don't work for me as they easily make your framework very complex and put a lot of extra strain on iteration speed, it should be a lot simpler and that's exactly what I'll be trying to accomplish.

A small note on the Gizmo for those of you who may be using it - I might release an update soon fixing some of the integration issues people might experience when they don't have a similar framework set-up. I will try to completely decouple the component which makes it a lot easier to integrate  into your own editor. (If you experienced any other issues, let me know and I will see if I can fix is along with the rest)

With all the other stuff going on I did not spend a single minute on V-script (Except for a presentation I did, I might talk about it some other time) So there is not much news on that I'm afraid.

Thursday, 10 March 2011

Visual Script 2.0

The above image contains the new (WIP) V-Script tool. It's much like the old script tool, working with Nodes similar to many other node-based frameworks out there. However, this new tool is build from the ground up and should end up with a much cleaner structure and higher flexibility. It will include Xbox 360 support, something that the old wasn't designed for.

As you can see above, I have most of the basics worked out. A cool feature that I added today is auto-alignment, this basically structures the connectors automatically and re-sizes the Node if necessary. The old system required you to manually place all connectors, which proved to be a pain for the more complex script-nodes that were added late in development. 

One last thing you can see is the new menu inside the XNA Game Window. There aren't captured by Fraps, so you couldn't see them in my last video while it was already implemented back then. It's still only a small proof of concept, it's a context-based menu that changes depending on what you've selected and/or are working on (particles, scripts, object-placement etc.) note that the gray bottom-bar (that is currently empty) will include info about the editor and gizmo properties etc.

Wednesday, 2 March 2011

Console Extension - Auto-complete & Suggestions.

I actually finished this last night, but I didn't post about it and decided to get some sleep instead. It's an extension on the console component I integrated a few weeks ago. It adds support for auto-complete and command suggestions. I might add an argument-completer as well in addition to some layout fixes.


(watch in HD 720p + fullscreen to read the text)

I originally got this idea from the UDK console that has a similar feature, it should make browsing and finding commands much faster and easier and doesn't rely on software knowledge as much.

It's based on the GameConsole by Vos which I believe is one of the best console component for XNA.

Saturday, 12 February 2011

Gizmo Roadmap & Engine Revamp

First off, there have been several updates for the Gizmo since the last announcement. You can download them on the Source Code-tab on Codeplex.

Most (features and code) has already been implemented by now, however there are still some nice features on the horizon. This includes:

- Grid & Rotation snapping.
- Multi-layer selection. (or click-through selection)
- Reset transform.
- Added support for multi-selection.
- Precision Mode.

Some of these were already part of the old gizmo, and others were already implemented in the internal version of the Gizmo I used in my own editor a while ago. So it shouldn't take long to implement any of these in the revamped public release...Stay tuned for updates!

Next, a quick notification on the Core Engine roadmap. Since there is currently no game in development I can make breaking changes without ramifications. This is something I often do when there are no games actively developed with the Engine. This time it's a pretty huge revamp of the complete engine-structure. So far I have deleted over 110 classes to make room for a new and improved structure including a much better GameState management system that is first on the list.

Not all code is deleted though, I will be using a lot of the old code for new components and managers, deleting them for now makes the re-design a lot quicker and efficient (preventing 100's of errors)

In addition to the new structure I'd like to design components in such a way that it's easier to create external projects for open-source initiatives such as sgMotion & GizmoComponent. If I can just copy/paste my own component to one of the open-source projects, it will be a lot easier to update and maintain. The Gizmo is a good project to fine-tune just that.

A new video should be up soon, once the Gizmo is out of Beta.

Saturday, 5 February 2011

GSM & Gizmo Update

Still no release available for the Gizmo project. However, with the Translation mode pretty much complete and the Rotation well under-way it's getting closer.

I finally created an SVN-host. This means the next Gizmo release will use it as well, so you should keep a sharp-eye on the Source Code tab of the project page.

Among other things I completely re-designed the GameState management of the engine. the previous GSM had faded over time in flexibility and support due to heavy changes in overall engine structure. This new system should increase readability, flexibility and performance. The Gizmo will use a small portion of the GSM. As it will be flexible, you can easily change the components to fit in your own framework without having to use mine.

The (normally invisible) collision hull of the Rotation-mode. Mesh vs. Ray will determine the selected axis.

The already complete Translation-mode. As seen in the previous video.

Tuesday, 2 November 2010

Project Sunburn: AI-Subsystem (First Dronetype & AI-Manager)

We completed our first playable prototype yesterday, and it includes AI! This was the first time I worked on game AI, previous games like Needle Juice and Over Night did not include any form of AI. Luckily our enemies are robotic, not human. It's a lot easier to create a believable drone that in-fact should act as if it's programmed compared to a humanoid character running around trying to act as a sentient being. So far the main drone class, the Spider-Drone, has been implemented and is strolling around in our game. Other drone types (including flying drones) will be added later in phase 2. (started yesterday) Below I wrote a very short summary of certain AI aspects that I included so far.

A lot of the info a drone requires is processed in a global manager class. This makes it easier to spread the workload across multiple frames, avoiding frame drops. One example is the Link Availability, testing the links against active drones in the level, blocking a certain link if a drone is not moving (shooting or idle), and therefore blocking that path. This avoids unnecessary navigation errors when drones try to reach the player.

Red lines indicate the path is blocked...

Another task that is handled by the AI-Manager is tagging waypoints as cover. As certain drone variations will hide behind cover to deploy their weaponry. These kind of non critical components are updated on low frequencies to safe CPU-cycles. In addition, only waypoints near the player can be tagged as potential cover.

The Yellow waypoints are tagged as "Cover"

All drones have some kind of weaponry to use against the player. Our first drone has a light machine gun, firing short bursts of bullets. Their weapons work very similar to the player weapons, so it was easy to setup. The turret tries to maintain a solid aim at the player (limited by its rotation speed) and fires bullet salvo's while trying while trying to get closer. In addition, the lens in front, can be destroyed by a single well-aimed shot. This basically counts as a headshot and immediately disables the drone.

These are some of the highlights currently implemented as part of the AI-Subsystem. In the upcoming phase I will spend more time optimizing the current manager, add air-drones, improve path-finding and improving overall behavior of the drones.

Wednesday, 13 October 2010

Editor Update: Clone-tool with ClonePreviewer

You can simply drag your clone to the desired location while using the scroll-wheel to determine the amount of clones you like. The process is finalized by pressing the Enter key.

The preview models share the same instance of the source model, rendered with an offset for each clone. The translation is snapped to the current grid size, alternatively you can use precision-mode (Shift) to fine-tune your clone-offset. Works with any type of placeable entities, however entities without a model (particles etc.) use simple boundingboxes/icons to show their destination. This may change in the future, where even particles may be fully rendered while previewing.

Sunday, 10 October 2010

Effortless Waypoint & Path creation using 3D-Sketching

About 3 weeks ago, I demonstrated the Sketching in 3D Tool. Today I went a little further and expanded it to be able to create waypoints and paths for our upcoming levels without effort. Manually placing waypoints can be a tedious task, especially if your level is continuously changing in its early stages. With this new Tool we'll be able to create full AI paths in seconds, with easy tweaking after the initial waypoints are setup.


Currently there are two types of lines. WaypointLines and AvoidanceLines, the latter is used to state certain parts should simply be avoided by the AI or to break paths that are too close to geometry or ledges.

Saturday, 18 September 2010

Engine Update: Sketching in 3D


Over the past 2 months I haven't posted a lot of news. With the new project up and running (kick-off was the 13th) I'll start doing more regular postings like I used to.

With the project details still being worked on, there is some time to develop tools that should make life easier later on in the development stage. So I decided to work on some odd ideas that I came up with while traveling. The first one is a pretty cool feature, its sketching in 3d. It uses the 3d meshes inside the level as a canvas to draw on. I think this is very useful for level designers and to help process play-testing feedback.


For this particular feature to work, triangle precision ray-testing was required. Luckily the XNA Creators Club had a sample project to get me started. The lines are made of vertices combined into a LineStrip. In addition the triangle normal is tested against the ray direction to prevent drawing on back-faced triangles.

While implementing triangle-precision picking I updated the Gizmo so it is now able to select models by triangle instead of the small boundingbox. Being used to 3D studio max' selection methods I decided to implement multi-layer selection. Because that name probably makes no sense, I'll try to explain it. If multiple objects are behind one another, clicking multiple times will select the object behind the previously selected object, clicking again will select the one behind it etc. That means you can select any object even if another is blocking your view.

Each click will pass through another "layer" and select the object occluded by the one in front.

Tuesday, 7 September 2010

Level & Content management [Part 3]

I got a question about my level and object management recently and was asked if I could talk about it. So in this post I'll explain my old and current method of dealing with (level) serialization and how I combined it with my game editor.

A few months ago I created my levels using a hybrid implementation of a level editor and code to create and connect objects. A game would have several "Scene" classes to be filled with Entities and later set at the correct position in 3D space using the level editor. This worked pretty well, especially since our team had limited time to work on our projects (8 weeks) so I wasn't able to create a fully featured editor at the time. One advantage was the ease of setting up connections and events between objects in a level, because everything is available in the Scene class. An obvious disadvantage was the inability of adding objects on the fly (in runtime) it required some planning to work efficiently. With the game Needle Juice there was only a limited about of objects that required the use of the editor, so again, a fully featured editor wasn't necessary.

However, after completing Over Night I set aside some time to work on a more complex editor to aid in the upcoming project(s). This meant a new way of serializing the Scene to store any data. This new method will be explained below, with some code snippets. On a side-note I strongly recommend looking at existing editors (like UDK) Fool around with it, learn its basics and see what fits your needs and what doesn't. I occasionally opened up an existing Unreal Tournament 3 map and messed around with it to hunt for new features. If you're the only developer to use that tool you can mold it to your exact specifications and preferences very easily.

Before I go on, the following is in no way the only or the best way of doing it. It worked for me and should be easy to implement for yourself. It will hopefully give you a clear idea of you can combine your own requirements with the examples shown.

First off, any object that exists in my level is an ISceneEntity (interface) with a Position, Rotation, Scale etc. The interface holds data that is necessary for any object in the world. Any class that derives from this interface or any other subclass may have its own properties that need to be serialized as well. That means a flexible serializer is required. Luckily Shawn was so kind to explain everything you ever wanted to know about IntermediateSerializer. I recommend you read through his article.

To store all data in your level your engine needs to know what to serialize and what to ignore. I use a fairly simple Level class to keep track of any objects currently in the world (and part of the serialization list) You add your Entity to a List in your Level class. The IntermediateSerializer will go through the list and store all Entities in an Xml level file.
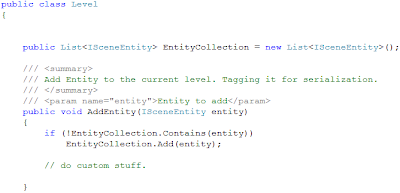
To actually store your level you need to call the IntermediateSerializer.Serialize() to write all of the level data to your disk.
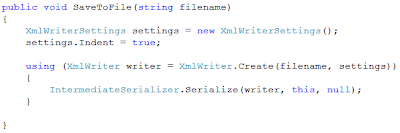
The above method is part of the Level.cs class.

If you're following along, don't forget to add the Microsoft.Xna.Framework.Content reference to your project folder. By default its already part of your Content project, when referencing in code, you need to add it to your game project as well. The IntermediateSerializer class is part of the Microsoft.Xna.Framework.Content.Pipeline.Serialization.Intermediate namespace.

Your level is now stored on disk. Some class will require setting some Attributes in order to be stored properly. Use the [ContentSerializerIgnore] Attribute over any public property that you want excluded. Use the [ContentSerializer] Attribute to include private or protected variables.
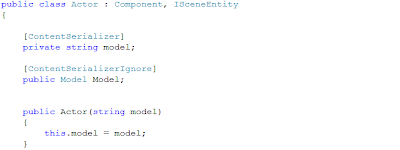
Finally to load all of your previously stored data you need to call IntermediateSerializer.Deserialize(). For more info I recommend reading through some of Shawn's articles about it.

I was going to talk about a new feature (mentioned in my previous post) that allows preloading of assets, reducing overall idle-time. This post is already long enough so I'll keep it in mind for some other time.

I hope this helps anyone looking to create his own editor. Level serialization isn't a complex operation, the most important thing is properly structured component system. If you have any questions you can post your comments in the comment section below.

Sunday, 29 August 2010

Engine Update: New Features & Tools!

It's been a while since my last post. That means I had a lot of time to add new features and spend more time on existing features as well. I'd like to include them in a video soon, for now I'll do a quick rundown of the most important new additions to the engine.

Preloading of Assets
Load Models, Textures, Video, SoundEffects in the background (Separate Thread) before the complete level is setup. The engine reads part of the level file and pulls out all the required assets for the upcoming level and load them before the game initiates a level transition.


Undo/Redo system
I Finally took the time to integrate this into the editor. For now it works primarily on SceneEntities (anything part of the level) and can undo translation/rotation/scale.


System messages
The system will "ping" important messages and warnings to the top-left corner of the screen, warning you of possible errors. (See above)

Game Properties Window
Allows you to set Engine properties as well as user-defined game properties, very useful when debugging.


3D Text Buttons
Selectable by mouse, useful for either ingame activators or 3D menus. Text is baked into a texture at runtime and stored on disk.


Improved Object placement
It's now possible to add objects using the Quick-menu (right-click popup) objects will be placed on the position the mouse is pointing in 3D.

Maya style navigation/orbit camera
Holding down "L"-key will orbit the currently selected object, scroll-wheel will zoom in/out.

VisualScript & AnimationEditor improvements
Added a lot of new Node-types and added the ability to directly add an animation to a new script.


Material editing inside VisualScript
All (Sunburn) material effects are stored and can be accessed using Script Nodes. Useful to dynamically set textures and other shader properties etc.

File browsing inside VisualScript
to easily attach files (Textures, Models, Levels etc.) to a Script Node.


I consider these the most significant changes/additions to the engine. Other things will show up in the next video.

Soon a new project will launch, lasting 4 months in total (instead of the previous 8 weeks we were given when building OverNight & Needle Juice) It's targeted towards XBLIG (Xbox Live Indie) and should be the first game to be fully developed (previous projects were prototypes, not full games) and released on that channel. I'm looking forward to get started, and will of course update on the progression of the game...

Wednesday, 28 July 2010

Engine Update: Shaders & Editor Additions

It has been a while since my last update. The image below shows some of the things I've worked on these past few days...


So what's new? First off, the shaders might have caught your attention, the lava is flowing and the arrows are flashing which you can't see in the still image unfortunately, I'll make sure to include them in the next video. They were really just experiments to get some practice with shaders and was hoping to use it for a material editor I was working on (had to put it on hold for now) Still, I think they look pretty cool (especially when you see them in motion)

The next thing you can see on the image is the ContextMenu (pop-up menu that appears when you right-click) Its part of the Editor and is rendered inside of the XNA Game window. XNA is still running as it is used to, winforms is added to the XNA window not the other way around.
As you can see there are several useful options inside this pop-up window. You can quickly add new Entities, add selected entities to your current script and continue playing or restart the level using the changes you made in edit-mode.

Hopefully I'm able create another video soon, showcasing some other additions that were added over the past couple of weeks. In the meanwhile I'm working on a game prototype, this directly aids in build the engine as well...

Sunday, 11 July 2010

Core Engine: Creating a simple level (Video)

I'm back with another video, this time I'll show you the creation of a (very) simple level. With The purpose of demonstrating some of the new additions, including the Animation Editor and the updated Visual Scripter. The video playback speed is set to x2 to reduce the overall length. Hopefully you'll enjoy watching and get a bit of insight in the engine's development capabilities.


The menu system shown in the video above is a WIP, originally all level objects were added at build-time. It's a big change in overall engine design to get these things working flawlessly with the new system. The core is aimed at rapid development and tweaking of the game/level while playing. It's been like that since day one and the new system should compliment that, increasing flexibility of the engine and speeding up the overall process of creating games.

Thursday, 8 July 2010

Visual Scripting Editor (Video)

It's 6:45 in the morning and the scripting editor is finally ready for a short demonstration. Spend most of the time cleaning up the node-system and made it a LOT easier to add additional node types in the future. The scripts are now directly stored inside the level file and can be stored separately if desired (for re-use in other levels)

In the video you will see two simple scripts, one animating a box and the other toggling a point light on and off. You'll also see the new Level Manager window, more on that later.


(Watch in HD & Fullscreen!)

Monday, 5 July 2010

Scripting for Artists (and programmers)

My last entry was over a week ago, but I've been very busy with C# nonetheless. The most interesting (to me at least...) is a visual scripter I've worked on for the past 4 days. It's supposed to work very similar to UE3/UDK's "Kismet". If you don't know what Kismet is, don't worry it is explained a little further in this entry. Although the visual scripter or artist-scripter (as it would be most useful to non-programmers) is not the only thing I've worked on (Animation Editor is another thing that is currently WIP), but I'll only talk about scripting for now.

The past couple of days I used MEL (scripting in maya) Unity Scripting and Dragon Age scripting. They all are terrible to get into. They are probably great if you spend a lot of time learning them, but I usually spend only a very limited about of time on any of those scripting languages. Now for "us" programmers it's not that hard to learn a scripting language if you take the time, but for artists and level designers whom only occasionally need to write a script it's very helpful to have a tool like Kismet. See below...

Example script made in Kismet.

Kismet is not designed to replace the regular scripting language in UE3...it's a tool to help create simple (and sometimes more complex) scripts for level specific behavior. The more complex and game wide scripting can only be done with the regular scripting language. Even though I'm a programmer and can probably live without this tool, I still decided to create something similar, as a challenge, a cool new feature and because it could prove to be very useful when working on our next game...

So far, the basic system is in place and working properly. I hadn't really worked with Winforms nor Event driven programming before, so this was a great way to get into that.

My own visual scripter implementation (visually still very unpolished)

Progress so far: A new script can be created at runtime, nodes can be dragged around, connections between nodes can be created and the whole script can be saved and reloaded to and from the hard drive. A few simple scripts have been created so far (ea. playing an elevator animation when the player enters a volume)

Similar to Kismet, you can load an animation file (previously created in the Animation Editor, more on that later) and play it when the assigned trigger is fired (Can be something like a level has completed loading or the player entered a trigger volume).

I should be able to demonstrate all this in a video shortly, first I'll continue working on essential usability features...
Be sure to keep an eye on my YouTube Channel if you'd like to get an early glimpse of the Scripter in action (I'll upload a video as soon as I feel it's ready to be recorded)

Saturday, 26 June 2010

Engine Update: (Finally?) Switching to Winforms

You might argue it's about time the engine got a proper interface, I agree :) I was trying to avoid using winforms (to keep compatibility with Xbox easy and maintainable to name a reason) and using the console for most if not ALL runtime actions (except for the Gizmo) I had my reasons for not using winforms, but after rethinking the overall design of the engine, its time to do things a little bit different...

One of the reasons that got me doubting the usability of the current interface is a new (and still WIP) feature for creating animations at runtime. The goal of the Animation Editor is not to create complex character animations, but rather allow the creation of quick and dynamic animations for rigid objects such as doors and elevators. At first I made it compatible with the Console like any feature prior to this one...It works, but is definitely not the best way to do animations. It's hard to know what keyframes are used, and what the timelines looks like...I made a very simple elevator animation (with acceleration and deceleration) and it does work...however it's not very flexible, at all.

That got me thinking and finally got me to try winforms...After an hour of experimenting, it finally worked. I'm pretty new to winforms, but it surprised me how easy most things can be achieved with very little effort. For starters I made a "Search Actors" window as well as a "Object Properties" window. Both are shown below. (Click on image for full-size)


The Search window can be activated using "Ctrl-F" like many other applications, clicking the "properties" button with an object selected will show its...properties.

I have a few other browsers/windows I'd like to get working on in the next couple of days (Tracker window, Content Browser, Animation Editor) I'm currently looking at UDK (Unreal Development Kit) for inspiration on browsers/windows. Their Content Browser is pretty great, and would really help with game development if Core Engine had something similar.
During development of "Over Night" we did lack a proper naming convention and both the asset naming and asset count quickly got out of hand. In the end it took a lot of time to find the proper texture file or locate a specific model.

I think I've talked enough about winforms for now :) I've got a few other features lined up, most of them are already working properly, but are still in early alpha stage...

Sunday, 20 June 2010

Engine Update: Scripting, ReverbVolume & Tracking Window

The first one is the ReverbVolume as seen in other game engines like Unreal Engine 3. The volume is very useful when defining rooms,allowing you to alter sound properties when either inside or outside of the volume. The volume alternation is already working when inside or outside of the volume, ironically the only thing that is not yet in place is the Reverb effect itself. I'll explain ReverbVolumes a little more in-depth later on once I've completed finished it, hopefully including the actual Reverb effect instead of just the volume/pitch modifiers. In the video on the bottom you can see/hear it for yourself.

The white box is the reverb volume, the blue circles are ambient sounds emitters (or actually the radius of the emitter)

Another concept I've been experimenting with is a sort of Tracking Window (or output/clipboard window) It's an additional (and optional) window that you can use to print out useful information. You can choose to print it as a static string. As a sort of clipboard/memory aid to help with Vector positions or pretty much any piece of info you may need to remember in runtime. If it were nothing more than that, it would pretty much be an in-editor notepad...So I added something I like to call "live-tracking" (or real-time tracking, or just tracking...) You can use the tracking feature to keep track of any property an object may have (positions, rotations, scale, volume, pitch, visbility etc.) the window uses a series of Slots that can be filled with one traceable object each. Most of it is already working, I'll have to spend some more time on it to add every little detail. Eventually I'd like to have each slot assessable and allow user input to change any of the properties that is being tracked by the window. You can see a sneak preview of it in the video below.

The tracker window is tracking the positions of 3 objects in the scene.

The last thing I worked on today was a basic scripting/event system. In both "Needle Juice" & "Over Night" the event code got really messy over time, requiring a lot more time to find anything...which is a complete waste of time, especially when you're nearing the end of a project. In order to prevent this from happening again I need to have a solid and clean system to handle events and scripts. So far I redesigned the TriggerVolume class used for any positional triggers and added support for Enter/Leave Volume events. To test the new system I made a (simple) script that opens and closes a door when the player approaches.

All of the described features above are shown in the short video below. Make sure to turn on your sound, because the reverbvolume can only explain itself with sound ;)


The first sound you hear is that of a bar, the second is a bit more difficult to hear, it represents the streets just outside of that same bar. when you move through the door, the indoor sound will fade to a lower volume while the street ambient becomes more noticeable.