It took a while to upload (on 56k wireless connection) but the video is finally available on YouTube. If you haven't seen the previous posts about this topic, the effect is based on UDK's implementation of 'Depth Dependent Halos' to increase readability of wireframes in complex scenes.
After I managed to get the desired effect I could simplify it significantly. Moving from two render-passes to one and from 18 texture look-ups to 'just' 9. This was possible by removing the normal 'diffuse' pass which is nothing more than the regular colored wireframe you can see in the video (when the halos are toggled-off), and instead using the information available inside the depth-buffer to construct the wireframe. This is pretty easy if you take into account that if (depth == 1) there is no geometry, where if (depth < 1) there is in fact a line that was drawn when constructing the depth-buffer. From this you create a colored wireframe and the halo inside the post-processor. The same data can be used to determine intersecting lines...removing the need for 9 texture lookups that sampled data from the original wireframe in the first prototype and instead re-using the sampled depth.
The result can be seen above...
Showing posts with label PostProcess. Show all posts
Showing posts with label PostProcess. Show all posts
Saturday, 21 May 2011

'Depth Dependent Halos' for Wireframe rendering [Part 2]
I have been working on getting the depth buffer to generate properly and using it to post-process the wires (i.e. creating the outline around the wireframe) and so far I'm quite satisfied...it's still a work in progress, but progress is going well...

This is the result so far, with the depth buffer drawn in the top-left corner and the final image in the middle.
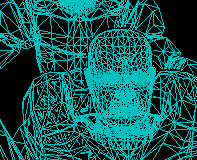
A zoomed-in version of the first image, the effect is visible around the characters head where you see a clear outline being formed, disconnecting it from the other character underneath it.
For comparison I used a color similar to UDK (see first image of previous post)
4 more texture-lookups will be added which adds improved support for diagonal lines - that would bring the total lookups to 14...which is quite a lot for a single effect, but since the geometry will never been drawn with fancy shaders while in this 'mode' (nor any other post-process effect) I don't expect it to be a problem. This effect provides the most benefit when moving around with the camera, I hope to upload a short video of this after I finalized the effect.

This is the result so far, with the depth buffer drawn in the top-left corner and the final image in the middle.

A zoomed-in version of the first image, the effect is visible around the characters head where you see a clear outline being formed, disconnecting it from the other character underneath it.
For comparison I used a color similar to UDK (see first image of previous post)
4 more texture-lookups will be added which adds improved support for diagonal lines - that would bring the total lookups to 14...which is quite a lot for a single effect, but since the geometry will never been drawn with fancy shaders while in this 'mode' (nor any other post-process effect) I don't expect it to be a problem. This effect provides the most benefit when moving around with the camera, I hope to upload a short video of this after I finalized the effect.
'Depth Dependent Halos' for Wireframe rendering
'Depth Dependent Halos' is something I read on the UDK site a while ago, it's for their 'new' (by now pretty old...) wireframe rendering that increases readability of the lines for complex scenes. I was kind of wondering how they accomplished this and wanted to try this out myself (I was working on a wireframe-mode anyway, so it was the right time to experiment)

I went through a few different approaches and ended up with a small post-processing shader that applies the halo around the wireframe lines. It took a few iterations to get the desired results, but I did end up with something that is pretty close to what I am looking for...
The first step was to create my regular wireframe and letting the post-processor create a small single pixel halo around these lines using a different color. The second step (still have to start on this one) will require a depth-buffer and use the depth information to determine if the outline/halo should be drawn with halos being drawn on top of lines underneath them, creating discontinuities between lines that intersect and are underneath others.
Some of the iterations I went through:


This is the effect I am trying to replicate. Black halos are drawn around the wireframe lines to provide a better understanding of depth differences between these lines.
I went through a few different approaches and ended up with a small post-processing shader that applies the halo around the wireframe lines. It took a few iterations to get the desired results, but I did end up with something that is pretty close to what I am looking for...
The first step was to create my regular wireframe and letting the post-processor create a small single pixel halo around these lines using a different color. The second step (still have to start on this one) will require a depth-buffer and use the depth information to determine if the outline/halo should be drawn with halos being drawn on top of lines underneath them, creating discontinuities between lines that intersect and are underneath others.
Some of the iterations I went through:

Trying to find out the correct pixel offset and coloring by finding edges and applying a different color to each direction (up/down/left/right in screen-space)

This is the current state of the code, and resembles the desired effect (of step 1) quite closely.

I have also been working on some additional scene navigation features. These are best shown in a video, but since I currently get my connection through a painfully slow USB stick - that will have to wait...
bonus image...(this result was less then expected, but looks pretty cool)

Wednesday, 13 October 2010
Sunday, 11 July 2010
Core Engine: Creating a simple level (Video)
I'm back with another video, this time I'll show you the creation of a (very) simple level. With The purpose of demonstrating some of the new additions, including the Animation Editor and the updated Visual Scripter. The video playback speed is set to x2 to reduce the overall length. Hopefully you'll enjoy watching and get a bit of insight in the engine's development capabilities.
The menu system shown in the video above is a WIP, originally all level objects were added at build-time. It's a big change in overall engine design to get these things working flawlessly with the new system. The core is aimed at rapid development and tweaking of the game/level while playing. It's been like that since day one and the new system should compliment that, increasing flexibility of the engine and speeding up the overall process of creating games.
Monday, 28 June 2010
Post-Processing Volumes
This time I'll keep the words to a minimum and let the images speak for themselves...(more info below)


Base Image

Increased black-point

Cold tint

Warm tint
If you've ever tried Post-Process Volumes inside of UDK/UE3 then you'll be familiar with the concept. I've tried to replicate a lot of its features. You can affect highlights, midtones and shadows (as seen in the images above) as well as bloomscale, blur, noise etc. They all react to the position of the player (inside or outside of the volume) and will transistion between the values when you enter/leave the associated volume. I'll upload a video of that later on...On a sidenote, I've made a lot of progress with the animation editor, more info on that will be available later on just like the video :)
Subscribe to:
Posts (Atom)